How to Fix Whirlpool Cabrio F51 Error Code: Rotor Position Sensor Diagnostic
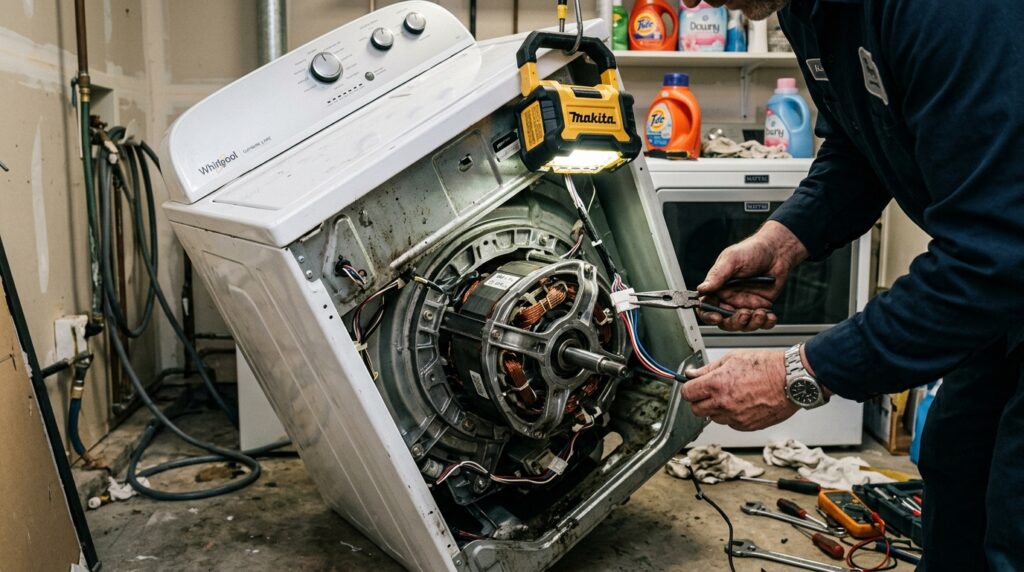
The F51 error code on Whirlpool Cabrio, Maytag Bravos, and Kenmore Oasis top-load washing machines signifies a Motor Rotor Position Sensor (RPS) communication fault. The main control board has lost speed and directional feedback from the brushless direct-drive motor. In over 70% of service calls, the sensor itself is functioning properly, but the terminal harness has worked loose from tub vibration or has developed contact oxidation.
Required Tools & Materials
- 1/4-Inch Nut Driver: For cabinet and rear access panels.
- 7/16-Inch Socket & Ratchet: To remove the central rotor bolt.
- Electrical Contact Cleaner Spray: 1 can.
- Replacement RPS Board (OEM Part #W10183157): If sensor board tests open circuit.
Step-by-Step Diagnostic & Repair Protocol
Enter Diagnostics Mode (Verify Fault Code)
With the washer in standby mode (plugged in, all LEDs off), rotate the cycle knob: 1 click counter-clockwise, 3 clicks clockwise, 1 click counter-clockwise, and 1 click clockwise within 5 seconds. All status lights will flash. Rotate knob until “Fault Codes” is selected, and press Start. Confirm “F” followed by “51” displays on the cycle counter.
Access the Bottom Direct-Drive Motor
Unplug the machine. Tape the washer lid shut with painter’s tape. Carefully tilt the washer back at a 45-degree angle and brace it securely against a wall or heavy wooden block. Locate the large bell-shaped rotor assembly in the center of the tub bottom.
Remove Rotor & Inspect RPS Harness
Hold the rotor steady with one hand while unscrewing the central 7/16-inch bolt counter-clockwise. Pull the rotor straight off the splined motor shaft (strong magnetic pull is normal). Inspect the thin circuit board (the RPS) clipped to the stator base. Look for loose wire terminals or broken solder pins. Unclip the wiring harness, spray both male and female contacts with electrical contact cleaner, and firmly reseat the plug until the plastic tab clicks into locked position.
Reassemble & Run Tachometer Test
Reinstall the magnetic rotor onto the shaft splines, apply medium-strength blue threadlocker to the bolt, and tighten securely. Return the machine to the upright level position. Reconnect power and run the diagnostic tachometer test: rotate the inner wash basket by hand; if status LEDs light sequentially as the basket turns, the RPS is communicating perfectly with the PCB.
Frequently Asked Questions
What if reseating the harness does not clear the F51 error?
If cleaning contacts fails, replace the RPS board itself (OEM W10183157). The sensor unclips with two plastic tabs from the stator without having to remove the entire stator coil assembly, making it a $25 DIY fix that takes 10 minutes.
Need Complete Emergency Restoration Sequences?
Get instant access to the Home Rescue Bible with 240+ pages of manufacturer error code maps, chemical ratios, and repair shortcuts.
Download Complete Bible ($39) →