Quick Answer
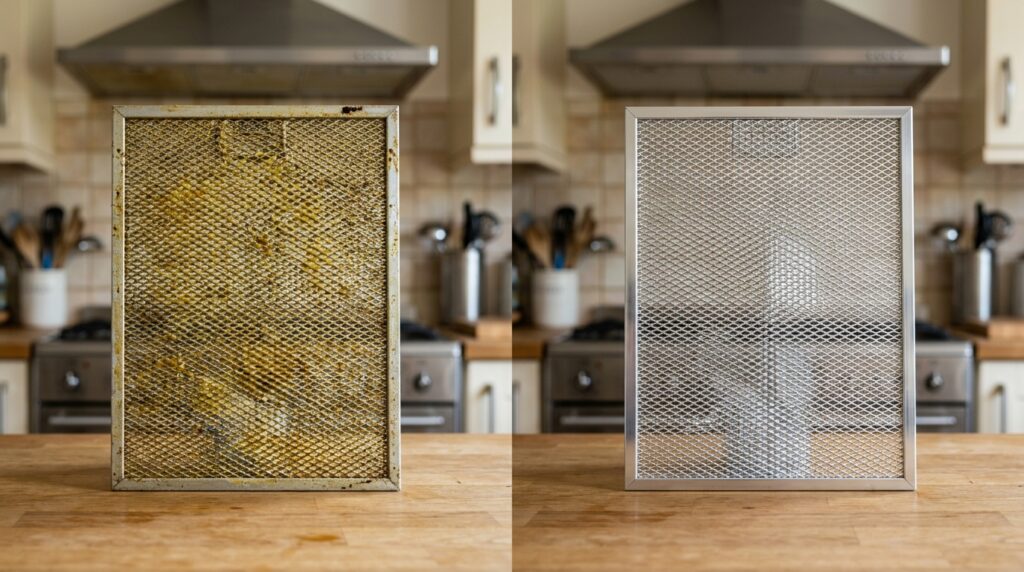
Remove thick grease from range hood filters by soaking them in a solution of boiling water, 1/2 cup baking soda, and 2 tablespoons of Dawn dish soap. Let them sit for 15-30 minutes, then scrub gently with a non-scratch pad and toothbrush before rinsing thoroughly with hot water.
A greasy, sticky range hood filter is one of the most neglected areas in a kitchen, but keeping it clean is critical for maintaining indoor air quality, reducing fire hazards, and ensuring your hood functions properly. As you cook, the hood fan draws up steam, smoke, and airborne grease. Over time, that grease condenses on the metal mesh filters, creating a thick, yellow, glue-like layer. If left unchecked, this buildup forces the exhaust fan to work harder, reducing its lifespan and decreasing efficiency. Furthermore, highly flammable grease deposits pose a serious risk if a flare-up occurs on the stovetop. But don’t panic! You don’t need harsh chemicals to restore your filters. The natural combination of baking soda, Dawn dish soap, and boiling water is highly effective at melting away years of grime.
In this comprehensive, 2026-updated guide, we will walk you through the precise steps to clean your range hood filters, the science behind why baking soda and Dawn are so effective, the differences between filter materials, how often you should be cleaning them, and crucial mistakes to avoid. By following these methods, you’ll ensure a safer, cleaner kitchen environment for you and your family.
- The Science Behind the Clean: Why Dawn and Baking Soda Work
- 🧹 What You Need
- Step-by-Step Instructions: Deep Cleaning Your Range Hood Filters
- Understanding Filter Types: Aluminum, Stainless Steel, and Charcoal
- How Often to Clean Range Hood Filters
- Signs Your Filter Needs Immediate Cleaning
- ⚠️ What NOT to Do
- Maintenance Tips for a Pristine Range Hood
- Deep Dive: The Evolution of Range Hoods and Filtration
- Environmental and Health Impacts of a Dirty Range Hood
- Troubleshooting Common Filter Cleaning Problems
- Advanced Cleaning: Taking Care of the Ductwork
- ❓ Frequently Asked Questions
- ✅ Bottom Line
- Author
The Science Behind the Clean: Why Dawn and Baking Soda Work
Before diving into the process, it’s helpful to understand why this specific combination of ingredients is so incredibly effective against polymerized kitchen grease. Cooking grease is primarily composed of lipids—fats and oils that become airborne when heated. When these aerosolized fats hit the cooler metal surface of a range hood filter, they solidify. Over time, exposure to heat and oxygen causes the oils to undergo a process called polymerization, turning them into a tough, sticky resin that resists standard wiping with water and soap.
Baking Soda (Sodium Bicarbonate): Baking soda is a mild alkali, meaning it has a pH higher than 7 (typically around 8-9). This alkalinity is the secret weapon against grease. Fats and oils contain fatty acids. When an alkaline substance like baking soda reacts with these fatty acids, it undergoes a process known as saponification—literally turning the grease into a type of water-soluble soap! Furthermore, baking soda acts as a very mild, non-scratch abrasive, providing just enough friction to lift the loosened grease without damaging the delicate metal mesh of your filters.
Dawn Dish Soap: Dawn is legendary in the cleaning world, famously used to clean crude oil off wildlife during oil spills. The reason Dawn is so effective lies in its specific formulation of surfactants. Surfactants (surface active agents) have a unique molecular structure with a hydrophilic (water-loving) head and a lipophilic (oil-loving) tail. The oil-loving tails grab onto the stubborn grease molecules on your filter, while the water-loving heads attach to the surrounding water. This creates microscopic structures called micelles that surround the grease, lifting it away from the surface and allowing it to be easily rinsed down the drain.
Boiling Water: Heat is the final, crucial component of this trinity. Polymerized grease is highly viscous at room temperature. Boiling water significantly lowers the viscosity of the fats, softening the resin and allowing the baking soda and Dawn to penetrate the grease layers much faster. The thermal energy accelerates the chemical reactions, making the degreasing process exponential rather than linear.
🧹 What You Need
- Baking Soda: 1/2 cup (minimum)
- Dawn Dish Soap: 2 tablespoons (the classic blue formula works best)
- Boiling Water: Enough to completely submerge the filters (usually 1-2 gallons)
- Container: A large pot, heat-safe baking dish, or your kitchen sink (with the stopper engaged)
- Tools: An old toothbrush (for crevices) and a non-scratch scrub pad (like a blue Scotch-Brite pad)
- Optional: A dedicated degreasing spray for extreme, multi-year buildup
- Safety: Rubber gloves to protect your hands from hot water and loosened grease
Step-by-Step Instructions: Deep Cleaning Your Range Hood Filters
Proper preparation and execution are key to achieving spotless filters without causing damage. Follow these precise steps for optimal results.
Step 1: Safely Remove the Filters from the Hood
Ensure your stovetop is turned off and completely cool before beginning. Locate the latch or loop on the underside of the range hood filter. Gently push the latch backward or pull it downwards, depending on your hood’s mechanism. The filter should easily slide out of its track. Support the filter with your other hand to prevent it from dropping onto your delicate cooktop. If the filter feels stuck due to excessive grease, do not force it! Use a hairdryer on a low heat setting to warm the edges slightly, which will soften the glue-like grease holding it in place. Lay the removed filters on a towel or newspaper to protect your countertops from sticky residue.
Step 2: Prepare Your Soaking Station
The most common and convenient place to soak filters is directly in your kitchen sink. Ensure the sink is meticulously clean and the drain stopper forms a tight seal. Alternatively, if your filters are small enough, you can use a large stainless steel pot, a heavy-duty plastic bin, or a glass baking dish. Bring a large kettle or pot of water to a rolling boil. You will need enough water to completely submerge the filters. For standard sinks, this is typically around 1.5 to 2 gallons of boiling water. The hotter the water, the more effectively it will melt the solidified grease.
Step 3: Add the Degreasing Agents
Once your sink or container is filled with boiling water, it’s time to add the active ingredients. Start by adding a generous squirt of Dawn dish soap—approximately 2 tablespoons. The water will become soapy. Next, very slowly and carefully sprinkle in 1/2 cup of baking soda. Warning: The baking soda will react rapidly with the hot water, causing it to fizz and foam vigorously. Pouring it too quickly can cause the hot water to overflow, creating a mess and a burn hazard. Add the baking soda in small increments, allowing the fizzing to subside before adding more. Stir the mixture gently with a long spoon or spatula until the baking soda is fully dissolved.
Step 4: Submerge and Soak the Filters
Wearing heavy rubber cleaning gloves, carefully lower the greasy filters into the hot, soapy solution. Ensure they are completely submerged. If the water doesn’t cover them entirely, boil a little more water and add it to the sink. The magic begins immediately as the heat and alkaline solution start breaking the bonds of the polymerized fat. Let the filters soak undisturbed for a minimum of 15 to 30 minutes. For heavily soiled filters that haven’t been cleaned in years, you may need to let them soak for up to an hour. During this time, you will notice the water turning a murky, brownish-yellow color—this is visual confirmation that the grease is lifting away from the metal mesh.
Step 5: The Scrubbing Phase
After the soaking period, most of the grease will have dissolved or loosened significantly. Put your rubber gloves back on (the water may still be warm and will be quite dirty). Lift one filter out of the water slightly. Using a non-scratch scrub pad (never use steel wool), gently scrub the surface of the filter in a circular motion. Apply moderate pressure, but be careful not to bend or dent the delicate aluminum mesh. For the edges, frames, and deep crevices where the mesh meets the frame, switch to an old toothbrush. The bristles of the toothbrush are perfect for dislodging stubborn grease pockets that the scrub pad cannot reach.
Step 6: Thorough Rinsing
Once you are satisfied that all the grease has been lifted, drain the dirty water from your sink. Turn on your faucet to the hottest water setting you can comfortably handle. Thoroughly rinse the filters under the running hot water. The hot water helps flush away any remaining soapy residue and dissolved grease, ensuring the mesh is completely clear. Rinse from both sides, allowing the water to flow directly through the mesh until the water runs crystal clear. Any leftover soap can attract dust and dirt faster once reinstalled, so be meticulous during the rinsing stage.
Step 7: Assess and Repeat if Necessary
Inspect the filters closely under a bright light. The metal mesh should look bright and shiny, with no tacky residue remaining. If you still see patches of yellow, polymerized grease, it means the buildup was exceptionally thick. In this case, do not aggressively scrub, as this may damage the mesh. Instead, repeat the entire soaking process with a fresh batch of boiling water, Dawn, and baking soda. A second soak will almost always break down the final layers of stubborn grime.
Step 8: Drying and Reinstallation
This is a critical, often-overlooked step. Never reinstall wet filters into your range hood. Moisture trapped in the mesh can lead to mildew, rust, and can negatively impact the electrical components of the exhaust fan. Shake the filters gently over the sink to remove excess water. Lay them flat on a clean, dry microfiber towel or a dish drying rack in a well-ventilated area. Allow them to air dry completely, which typically takes a few hours. Once they are bone-dry, slide them back into the tracks on the underside of your range hood and click them securely into place.
Understanding Filter Types: Aluminum, Stainless Steel, and Charcoal
Not all range hood filters are created equal. The material composition of your filter dictates the most appropriate cleaning methods. Identifying your filter type is essential before starting the deep clean.
Aluminum Mesh Filters: These are the most common filters found in residential range hoods. They are lightweight, inexpensive, and highly effective at trapping grease. However, aluminum is a relatively soft and reactive metal. It is highly susceptible to discoloration, oxidation, and pitting if exposed to harsh alkaline chemicals, bleach, or the abrasive detergents found in dishwashers. The Dawn and baking soda method detailed above is generally safe for aluminum, but you must monitor the soaking time. Leaving aluminum in a hot alkaline solution for too long (over an hour) can dull the finish.
Stainless Steel Baffle Filters: Often found in commercial kitchens and high-end residential, professional-style hoods, baffle filters are incredibly durable. Instead of a mesh, they feature a series of interlocking, curved metal slats (baffles) that force the air to rapidly change direction. As the air changes course, the heavier grease droplets are thrown against the slats and drain down into a collection tray. Stainless steel is resistant to corrosion and can withstand harsher cleaning methods, including being run through a hot cycle in the dishwasher. However, the Dawn and baking soda soak remains an excellent, gentle method for regular maintenance.
Charcoal (Carbon) Filters: These filters are used specifically in ductless (recirculating) range hoods. Since ductless hoods do not vent the exhaust air outside, they must scrub the air of odors and smoke before blowing it back into the kitchen. Charcoal filters contain activated carbon granules that trap these odor-causing molecules. Crucially, charcoal filters cannot be washed. Washing them destroys the porous structure of the activated carbon, rendering them useless. They must be discarded and replaced entirely when they become saturated, typically every 3 to 6 months depending on cooking frequency.
How Often to Clean Range Hood Filters
The frequency of cleaning depends entirely on your cooking habits. A family that cooks elaborate meals every evening will require more frequent maintenance than someone who primarily uses the microwave. Here are some general guidelines:
- Daily/Weekly Cooks: If you cook most days, especially frying, searing meats, or using woks, you should aim to clean your metal mesh filters every 3 to 4 weeks.
- Moderate Cooks: For those who cook a few times a week, a thorough clean every 2 to 3 months is usually sufficient.
- Infrequent Cooks: Even if you rarely cook on the stovetop, airborne dust and environmental pollutants can still settle on the sticky residue. Aim to clean them at least twice a year to maintain airflow efficiency.
Signs Your Filter Needs Immediate Cleaning
Don’t wait for a scheduled date if your range hood is showing signs of distress. Watch out for these red flags:
- Reduced Suction Power: If smoke or steam seems to be billowing into the room rather than being drawn up into the hood, the filters are likely clogged with grease, severely restricting airflow.
- Visible Grease Dripping: This is a severe sign of neglect. If you notice droplets of yellow or brown grease forming on the underside of the hood or dripping onto the stove, the filters are completely saturated and present a significant fire hazard.
- Loud or Laboring Fan: A fan motor that sounds noticeably louder, whiny, or strained is struggling to pull air through a blockage. Cleaning the filters will immediately reduce the strain on the motor.
- Lingering Cooking Odors: If the smell of last night’s fish fry is still prominent in the kitchen, the grease trapped in the filters has likely gone rancid and is emitting the odor.
⚠️ What NOT to Do
- DO NOT put aluminum filters in the dishwasher: Modern dishwasher detergents are highly alkaline and contain bleaching agents. The harsh chemicals, combined with intense heat and prolonged water exposure, will cause aluminum filters to oxidize, turn chalky white, and degrade rapidly.
- DO NOT use abrasive cleaners on mesh: Avoid steel wool, pumice stones, wire brushes, or harsh scouring powders like Bar Keepers Friend on delicate aluminum mesh. These will scratch, dent, and permanently warp the metal fibers, reducing their structural integrity.
- DO NOT reinstall wet filters: Trapped moisture can lead to rapid rust development, promote mold and mildew growth within the hood casing, and potentially short-circuit delicate electrical components near the fan motor.
- DO NOT ignore the hood exterior: Cleaning the filters is only half the job. Failure to wipe down the exterior surfaces of the hood allows grease to build up, turning into a sticky dust magnet that is incredibly difficult to remove later.
- DO NOT use oven cleaner indiscriminately: While commercial oven cleaners dissolve grease quickly, they contain highly caustic chemicals like sodium hydroxide (lye) that will instantly corrode and destroy aluminum components. They should only be used as an absolute last resort on heavy-duty stainless steel components, and even then, with extreme caution.
Maintenance Tips for a Pristine Range Hood
Preventative maintenance is far easier than reactive deep cleaning. Incorporate these simple habits into your kitchen routine:
- Wipe Down the Exterior Monthly: Use a simple degreasing spray or a microfiber cloth dampened with soapy water to wipe down the exterior canopy, control panel, and underside of the hood at least once a month to prevent sticky buildup.
- Deep Clean Filters Every 1-3 Months: Adhere to a regular soaking schedule based on your cooking frequency. Set a recurring reminder on your phone so you don’t forget.
- Replace Charcoal Filters Religiously: If you have a ductless system, replace the carbon filters every 6 months. Mark the date on the filter itself with a sharpie when you install a new one.
- Run the Fan Proactively: Turn the exhaust fan on 5 minutes before you start cooking to establish a steady airflow pattern, and leave it running for 10 minutes after you finish to ensure all residual smoke, steam, and airborne grease are evacuated from the room.
Deep Dive: The Evolution of Range Hoods and Filtration
To truly appreciate the importance of maintaining your range hood filters, it helps to understand the evolution of kitchen ventilation. In the early 20th century, residential kitchens were often poorly ventilated, leading to lingering odors, poor indoor air quality, and dangerous accumulations of grease on walls and cabinetry. The invention of the modern range hood revolutionized kitchen design, providing a centralized system to capture and expel airborne contaminants.
Early iterations relied on rudimentary, inefficient exhaust fans that simply blew air outside without significant filtration. However, as cooking styles evolved and the understanding of indoor air pollution deepened, engineers recognized the critical need to trap grease before it could coat the internal ductwork. Thus, the metal mesh filter was born. Today, these filters are a sophisticated blend of materials and geometric designs optimized to maximize surface area, creating a tortuous path for the exhaust air. This design ensures that heavy grease particles collide with the metal fibers and condense, while the cleaner air flows through relatively unimpeded.
Environmental and Health Impacts of a Dirty Range Hood
Many homeowners view a greasy range hood as a mere aesthetic annoyance. However, the implications extend far beyond appearances, impacting both environmental health and personal safety.
Indoor Air Quality (IAQ): Cooking, particularly high-heat methods like frying or searing, releases a complex mixture of pollutants into the air. These include volatile organic compounds (VOCs), fine particulate matter (PM2.5), nitrogen dioxide (NO2), and carbon monoxide (CO). A properly functioning range hood, equipped with clean filters, is the primary defense against these pollutants. When filters are severely clogged with polymerized grease, airflow is restricted by up to 80%. This forces the contaminated air to circulate back into the living space. Prolonged exposure to poor IAQ has been linked to respiratory issues, exacerbation of asthma, and other long-term health concerns.
Fire Hazards and Safety Protocols: The most immediate and severe consequence of neglecting range hood maintenance is the heightened risk of grease fires. Cooking oils have high flash points, but accumulated, degraded grease on a filter can ignite at lower temperatures. A flare-up on the stovetop can easily jump to a saturated filter, rapidly spreading flames into the hidden exhaust ductwork where they are incredibly difficult to extinguish. Regular cleaning removes this highly flammable fuel source, creating a critical safety barrier in the kitchen.
Troubleshooting Common Filter Cleaning Problems
Even with the best intentions and methods, you might encounter challenges when tackling severely neglected filters. Here are advanced troubleshooting strategies:
The Grease Has Hardened into a Cement-like Crust: In extreme cases where the filter hasn’t been cleaned in decades, the polymerized grease may have petrified. A standard boiling water soak might not be enough. In these rare instances, you can employ a stronger degreasing technique utilizing washing soda (sodium carbonate), which is significantly more alkaline than baking soda (sodium bicarbonate). Substitute the baking soda with 1/4 cup of washing soda, but proceed with extreme caution. Wear heavy-duty gloves and eye protection. Limit the soaking time to 10-15 minutes max, as the higher alkalinity will aggressively attack aluminum finishes.
Odors Persist Even After Cleaning: If the metal mesh is visibly clean but a rancid odor lingers, the grease may have permeated the microscopic pores of the metal. To neutralize the odor, create a neutralizing bath using a mixture of hot water and one cup of distilled white vinegar. Soak the clean filters for 10 minutes. The mild acetic acid in the vinegar will break down the odorous compounds. Ensure you thoroughly rinse the filters with fresh water afterward to remove any acidic residue.
The Filter Frame is Bent or Misaligned: Often, the struggle of removing a sticky filter leads to bending the delicate aluminum frame. A bent frame will not seat properly in the hood, creating gaps where unfiltered air and grease can bypass the mesh. Carefully place the bent filter on a flat, sturdy surface like a workbench. Use a rubber mallet and a wooden block to gently tap the frame back into square. Never use a metal hammer, as this will irreparably crush the frame. If the frame is severely compromised, it is safer to purchase a replacement filter.
Advanced Cleaning: Taking Care of the Ductwork
While this guide focuses on the filters, it is important to acknowledge the system as a whole. The filters are the first line of defense, but some grease inevitably escapes and coats the internal ductwork leading outside. Over several years, this buildup can become a hidden hazard.
While homeowners can easily clean filters, professional duct cleaning is recommended for the internal exhaust system every 3 to 5 years. Professionals use specialized rotational brushes and high-powered vacuum systems to dislodge and remove the accumulated grease lining the ducts. Maintaining spotless filters significantly extends the time needed between professional duct cleanings, saving you money and hassle in the long run.
❓ Frequently Asked Questions
Can I put range hood filters in the dishwasher?
It depends entirely on the material. Stainless steel baffle filters can generally be washed safely in a dishwasher. However, aluminum mesh filters should never be put in the dishwasher. The extreme heat and highly alkaline detergents will cause the aluminum to oxidize, discolor (turning a dull grey or chalky white), and degrade prematurely.
How do I clean charcoal filters?
You cannot wash or clean charcoal (activated carbon) filters. Exposing them to water destroys the microscopic porous structure that allows the carbon to trap odors. They are strictly single-use items and must be completely replaced every 3 to 6 months, depending on how often you cook.
What if the grease won’t come off after the first soak?
If the grease is heavily polymerized from years of neglect, a single soak may not be sufficient. Do not resort to aggressive scrubbing. Instead, prepare a fresh bath of boiling water, baking soda, and Dawn, and soak the filters for another 30-60 minutes. The successive applications of heat and alkaline solution will eventually break down even the toughest grease layers.
How do I clean the exterior of the range hood?
For standard maintenance, wipe down the exterior with a microfiber cloth dampened with warm water and a few drops of dish soap. For sticky grease buildup, you can use a commercial degreasing spray or a 50/50 mixture of white vinegar and water. Always wipe in the direction of the grain if you have a stainless steel hood, and buff dry with a clean microfiber cloth to prevent water spots.
Should I replace or clean my metal mesh filters?
Metal mesh filters are designed to be permanent, washable components of your hood. You only need to replace them if they are physically damaged—such as if the mesh is torn, heavily dented, rusting, or if the frame is bent to the point where it no longer fits securely into the hood tracks.
What causes the yellow sticky buildup on the filters?
That yellow, glue-like substance is polymerized cooking grease. When aerosolized fats from cooking hit the metal filter, they condense. Over time, exposure to heat and oxygen causes the fat molecules to cross-link and harden into a sticky resin that cannot be removed with simple wiping.
Can I use oven cleaner on range hood filters?
It is strongly discouraged, especially for aluminum filters. Commercial oven cleaners contain incredibly harsh caustic chemicals (like lye) that will rapidly corrode, pit, and destroy aluminum. While they might work on heavy-duty stainless steel baffle filters, the baking soda and Dawn method is much safer, highly effective, and doesn’t introduce toxic fumes into your kitchen.
✅ Bottom Line
Cleaning greasy range hood filters doesn’t require harsh, toxic chemicals or immense physical effort. By utilizing the simple science behind heat, the alkaline properties of baking soda, and the grease-cutting surfactants in Dawn dish soap, you can effortlessly melt away years of stubborn, polymerized buildup. Make this 15-minute soaking routine a regular part of your kitchen maintenance schedule every 1 to 3 months. Not only will your filters look sparkling clean, but your range hood will operate more efficiently, your indoor air quality will improve, and you’ll significantly reduce the risk of dangerous kitchen grease fires.