Quick Answer
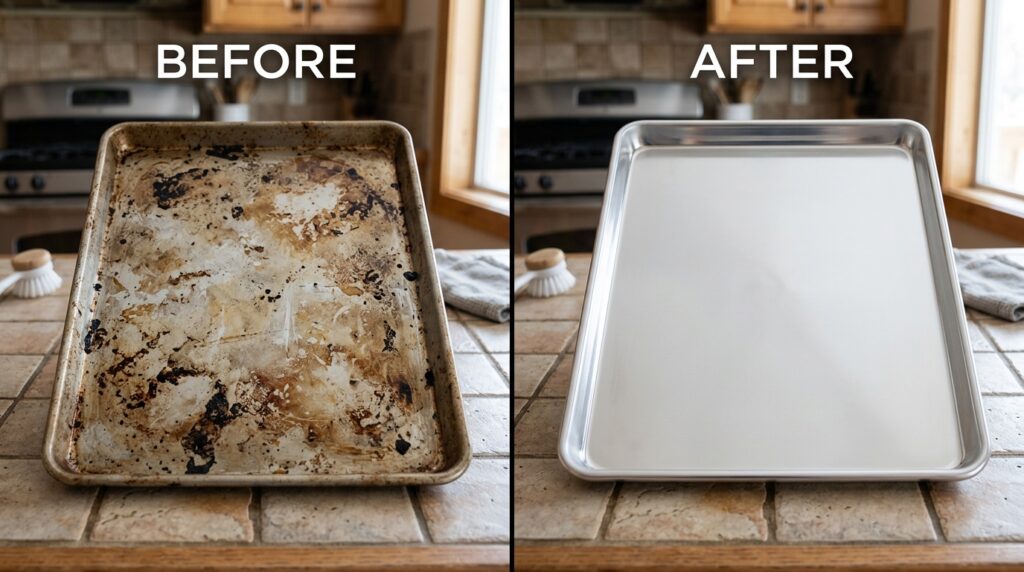
To clean dirty baking trays quickly, create a paste using baking soda and 3% hydrogen peroxide. Apply the mixture generously to the stained areas and let it sit for at least 30 minutes. Scrub gently with a non-scratch pad, rinse thoroughly with warm water, and dry completely to restore your baking sheets to their original, sparkling clean condition.
Baking trays are the unsung heroes of our kitchens, enduring high temperatures, baked-on grease, and sticky residues week after week. If you’ve ever pulled a baking sheet out of the oven only to realize it’s covered in stubborn, polymerized grease and burnt food particles that refuse to wash off with regular dish soap, you’re not alone. The search for the ultimate solution on how to clean baking trays often leads home cooks down a rabbit hole of ineffective commercial cleaners and frustrating scrubbing sessions. However, the most powerful and effective cleaning method might already be sitting in your pantry and medicine cabinet. In this comprehensive guide, we will explore the unbeatable combination of baking soda and hydrogen peroxide, a dynamic duo that effortlessly lifts years of baked-on grime, transforming your heavily soiled baking trays back to their gleaming, ready-to-use glory. We will delve deep into the science behind this cleaning method, provide exact step-by-step instructions, and answer all your frequently asked questions to ensure your baking sheets remain in pristine condition for years to come. The longevity of your kitchenware depends significantly on how well you maintain it, and with the techniques outlined in this 2026 guide, you will never have to throw away a dirty baking tray again. Get ready to witness a cleaning miracle that is both eco-friendly and incredibly budget-friendly.
Why Baking Soda and Hydrogen Peroxide Work So Well Together
The combination of baking soda (sodium bicarbonate) and hydrogen peroxide is a well-known powerhouse in the world of DIY cleaning. Baking soda acts as a mild abrasive, gently lifting dirt and grease without scratching most surfaces. It is naturally alkaline, which means it excels at neutralizing acidic grease and food residues. Hydrogen peroxide, on the other hand, is a mild bleach and oxidizing agent. When these two ingredients are combined, they create an oxygenated cleaning paste that penetrates deep into polymerized grease—the hardened, sticky brown residue that forms on baking trays after repeated exposure to high heat. The peroxide works to break the chemical bonds of the burnt-on stains, while the baking soda provides the necessary friction to scrub them away. Adding a small amount of dish soap further enhances this mixture by reducing surface tension and helping to lift away the detached grease particles. This triad of ingredients forms an unstoppable force against even the most neglected kitchenware, making it the ultimate solution for how to clean baking trays.
The combination of baking soda (sodium bicarbonate) and hydrogen peroxide is a well-known powerhouse in the world of DIY cleaning. Baking soda acts as a mild abrasive, gently lifting dirt and grease without scratching most surfaces. It is naturally alkaline, which means it excels at neutralizing acidic grease and food residues. Hydrogen peroxide, on the other hand, is a mild bleach and oxidizing agent. When these two ingredients are combined, they create an oxygenated cleaning paste that penetrates deep into polymerized grease—the hardened, sticky brown residue that forms on baking trays after repeated exposure to high heat. The peroxide works to break the chemical bonds of the burnt-on stains, while the baking soda provides the necessary friction to scrub them away. Adding a small amount of dish soap further enhances this mixture by reducing surface tension and helping to lift away the detached grease particles. This triad of ingredients forms an unstoppable force against even the most neglected kitchenware, making it the ultimate solution for how to clean baking trays.
The combination of baking soda (sodium bicarbonate) and hydrogen peroxide is a well-known powerhouse in the world of DIY cleaning. Baking soda acts as a mild abrasive, gently lifting dirt and grease without scratching most surfaces. It is naturally alkaline, which means it excels at neutralizing acidic grease and food residues. Hydrogen peroxide, on the other hand, is a mild bleach and oxidizing agent. When these two ingredients are combined, they create an oxygenated cleaning paste that penetrates deep into polymerized grease—the hardened, sticky brown residue that forms on baking trays after repeated exposure to high heat. The peroxide works to break the chemical bonds of the burnt-on stains, while the baking soda provides the necessary friction to scrub them away. Adding a small amount of dish soap further enhances this mixture by reducing surface tension and helping to lift away the detached grease particles. This triad of ingredients forms an unstoppable force against even the most neglected kitchenware, making it the ultimate solution for how to clean baking trays.
The combination of baking soda (sodium bicarbonate) and hydrogen peroxide is a well-known powerhouse in the world of DIY cleaning. Baking soda acts as a mild abrasive, gently lifting dirt and grease without scratching most surfaces. It is naturally alkaline, which means it excels at neutralizing acidic grease and food residues. Hydrogen peroxide, on the other hand, is a mild bleach and oxidizing agent. When these two ingredients are combined, they create an oxygenated cleaning paste that penetrates deep into polymerized grease—the hardened, sticky brown residue that forms on baking trays after repeated exposure to high heat. The peroxide works to break the chemical bonds of the burnt-on stains, while the baking soda provides the necessary friction to scrub them away. Adding a small amount of dish soap further enhances this mixture by reducing surface tension and helping to lift away the detached grease particles. This triad of ingredients forms an unstoppable force against even the most neglected kitchenware, making it the ultimate solution for how to clean baking trays.
The combination of baking soda (sodium bicarbonate) and hydrogen peroxide is a well-known powerhouse in the world of DIY cleaning. Baking soda acts as a mild abrasive, gently lifting dirt and grease without scratching most surfaces. It is naturally alkaline, which means it excels at neutralizing acidic grease and food residues. Hydrogen peroxide, on the other hand, is a mild bleach and oxidizing agent. When these two ingredients are combined, they create an oxygenated cleaning paste that penetrates deep into polymerized grease—the hardened, sticky brown residue that forms on baking trays after repeated exposure to high heat. The peroxide works to break the chemical bonds of the burnt-on stains, while the baking soda provides the necessary friction to scrub them away. Adding a small amount of dish soap further enhances this mixture by reducing surface tension and helping to lift away the detached grease particles. This triad of ingredients forms an unstoppable force against even the most neglected kitchenware, making it the ultimate solution for how to clean baking trays.
🧹 What You Need
- 1/2 cup baking soda
- 1/4 cup hydrogen peroxide (3% concentration)
- 1 tsp Dawn dish soap (or similar grease-cutting liquid)
- Hot water (for rinsing)
- Non-scratch scrub pad (e.g., Scotch-Brite Non-Scratch)
- Steel wool (optional, ONLY for heavy buildup on uncoated aluminum trays)
- White vinegar (optional, for final shine)
Step-by-Step Instructions: How to Clean Baking Trays
Step 1: Remove Loose Food Debris
Before applying any cleaning paste, it is crucial to start with a surface that is free of loose crumbs, oils, and easily removable debris. Begin by washing the baking tray with hot, soapy water and a regular dish sponge. Scrape off any large pieces of burnt food using a plastic scraper or the edge of a spatula. Avoid using metal utensils at this stage to prevent unnecessary scratches. Thoroughly dry the tray with a paper towel or dishcloth. Applying the cleaning paste to a dry surface ensures that it adheres properly to the stubborn stains rather than sliding off due to excess moisture. This preliminary step might seem trivial, but it significantly reduces the amount of work the baking soda paste needs to do, allowing it to focus entirely on the tough, baked-on grime that requires chemical intervention.
Before applying any cleaning paste, it is crucial to start with a surface that is free of loose crumbs, oils, and easily removable debris. Begin by washing the baking tray with hot, soapy water and a regular dish sponge. Scrape off any large pieces of burnt food using a plastic scraper or the edge of a spatula. Avoid using metal utensils at this stage to prevent unnecessary scratches. Thoroughly dry the tray with a paper towel or dishcloth. Applying the cleaning paste to a dry surface ensures that it adheres properly to the stubborn stains rather than sliding off due to excess moisture. This preliminary step might seem trivial, but it significantly reduces the amount of work the baking soda paste needs to do, allowing it to focus entirely on the tough, baked-on grime that requires chemical intervention.
Before applying any cleaning paste, it is crucial to start with a surface that is free of loose crumbs, oils, and easily removable debris. Begin by washing the baking tray with hot, soapy water and a regular dish sponge. Scrape off any large pieces of burnt food using a plastic scraper or the edge of a spatula. Avoid using metal utensils at this stage to prevent unnecessary scratches. Thoroughly dry the tray with a paper towel or dishcloth. Applying the cleaning paste to a dry surface ensures that it adheres properly to the stubborn stains rather than sliding off due to excess moisture. This preliminary step might seem trivial, but it significantly reduces the amount of work the baking soda paste needs to do, allowing it to focus entirely on the tough, baked-on grime that requires chemical intervention.
Step 2: Create the Baking Soda Paste
In a small mixing bowl, combine 1/2 cup of baking soda, 1/4 cup of 3% hydrogen peroxide, and 1 teaspoon of Dawn dish soap. Stir the mixture vigorously until it forms a thick, spreadable paste. The consistency should resemble thick frosting or wet sand—it needs to be viscous enough to cling to the sides of the baking tray without running off. If the paste is too runny, add a little more baking soda; if it is too thick, add a few drops of hydrogen peroxide. The addition of dish soap is the secret ingredient that boosts the degreasing power of the mixture, allowing it to penetrate through layers of oil that the peroxide and baking soda alone might struggle with. This freshly mixed paste is active and should be used immediately for optimal results.
In a small mixing bowl, combine 1/2 cup of baking soda, 1/4 cup of 3% hydrogen peroxide, and 1 teaspoon of Dawn dish soap. Stir the mixture vigorously until it forms a thick, spreadable paste. The consistency should resemble thick frosting or wet sand—it needs to be viscous enough to cling to the sides of the baking tray without running off. If the paste is too runny, add a little more baking soda; if it is too thick, add a few drops of hydrogen peroxide. The addition of dish soap is the secret ingredient that boosts the degreasing power of the mixture, allowing it to penetrate through layers of oil that the peroxide and baking soda alone might struggle with. This freshly mixed paste is active and should be used immediately for optimal results.
In a small mixing bowl, combine 1/2 cup of baking soda, 1/4 cup of 3% hydrogen peroxide, and 1 teaspoon of Dawn dish soap. Stir the mixture vigorously until it forms a thick, spreadable paste. The consistency should resemble thick frosting or wet sand—it needs to be viscous enough to cling to the sides of the baking tray without running off. If the paste is too runny, add a little more baking soda; if it is too thick, add a few drops of hydrogen peroxide. The addition of dish soap is the secret ingredient that boosts the degreasing power of the mixture, allowing it to penetrate through layers of oil that the peroxide and baking soda alone might struggle with. This freshly mixed paste is active and should be used immediately for optimal results.
Step 3: Apply Paste and Let Sit (The Waiting Game)
Using a spoon, a pastry brush, or your gloved hands, generously apply the paste across the entire surface of the baking tray, paying special attention to the corners, edges, and areas with the heaviest buildup of brown grease. Ensure the stains are completely covered with a thick layer of the mixture. Once applied, the hardest part begins: waiting. For moderate stains, let the paste sit undisturbed for at least 30 minutes. This dwell time allows the hydrogen peroxide to oxidize and break down the tough chemical bonds of the polymerized oils. For severely burnt-on messes and trays that haven’t been deep-cleaned in years, allow the paste to sit overnight. The longer it sits, the more effective the chemical reaction will be, making the subsequent scrubbing phase significantly easier.
Using a spoon, a pastry brush, or your gloved hands, generously apply the paste across the entire surface of the baking tray, paying special attention to the corners, edges, and areas with the heaviest buildup of brown grease. Ensure the stains are completely covered with a thick layer of the mixture. Once applied, the hardest part begins: waiting. For moderate stains, let the paste sit undisturbed for at least 30 minutes. This dwell time allows the hydrogen peroxide to oxidize and break down the tough chemical bonds of the polymerized oils. For severely burnt-on messes and trays that haven’t been deep-cleaned in years, allow the paste to sit overnight. The longer it sits, the more effective the chemical reaction will be, making the subsequent scrubbing phase significantly easier.
Using a spoon, a pastry brush, or your gloved hands, generously apply the paste across the entire surface of the baking tray, paying special attention to the corners, edges, and areas with the heaviest buildup of brown grease. Ensure the stains are completely covered with a thick layer of the mixture. Once applied, the hardest part begins: waiting. For moderate stains, let the paste sit undisturbed for at least 30 minutes. This dwell time allows the hydrogen peroxide to oxidize and break down the tough chemical bonds of the polymerized oils. For severely burnt-on messes and trays that haven’t been deep-cleaned in years, allow the paste to sit overnight. The longer it sits, the more effective the chemical reaction will be, making the subsequent scrubbing phase significantly easier.
Step 4: Scrub with a Non-Scratch Pad
After the designated waiting period, it is time to manually remove the loosened grime. Take a non-scratch scrub pad and begin working the paste into the stains using firm, circular motions. You will likely notice the white paste turning brown as it lifts the baked-on grease from the surface of the tray. For most trays, especially non-stick ones, a non-scratch pad provides sufficient abrasion without damaging the coating. If you are cleaning a plain, uncoated aluminum tray with extreme buildup, you may carefully employ a fine-grade steel wool pad to tackle the most stubborn spots. However, exercise extreme caution and only use steel wool if absolutely necessary, as it can dull the finish of the aluminum over time.
After the designated waiting period, it is time to manually remove the loosened grime. Take a non-scratch scrub pad and begin working the paste into the stains using firm, circular motions. You will likely notice the white paste turning brown as it lifts the baked-on grease from the surface of the tray. For most trays, especially non-stick ones, a non-scratch pad provides sufficient abrasion without damaging the coating. If you are cleaning a plain, uncoated aluminum tray with extreme buildup, you may carefully employ a fine-grade steel wool pad to tackle the most stubborn spots. However, exercise extreme caution and only use steel wool if absolutely necessary, as it can dull the finish of the aluminum over time.
After the designated waiting period, it is time to manually remove the loosened grime. Take a non-scratch scrub pad and begin working the paste into the stains using firm, circular motions. You will likely notice the white paste turning brown as it lifts the baked-on grease from the surface of the tray. For most trays, especially non-stick ones, a non-scratch pad provides sufficient abrasion without damaging the coating. If you are cleaning a plain, uncoated aluminum tray with extreme buildup, you may carefully employ a fine-grade steel wool pad to tackle the most stubborn spots. However, exercise extreme caution and only use steel wool if absolutely necessary, as it can dull the finish of the aluminum over time.
Step 5: Vinegar Rinse for Extra Sparkle (Optional)
Once you are satisfied that the grease has been lifted, rinse the baking tray thoroughly under hot, running water. Ensure all traces of the baking soda paste are washed away. For an extra touch of brilliance and to neutralize any remaining alkaline residue from the baking soda, you can perform a quick vinegar rinse. Lightly spray the tray with white vinegar or wipe it down with a vinegar-soaked cloth. The mild acidity of the vinegar will react with any leftover baking soda, creating a fizzing action that lifts away the final microscopic particles of dirt. Rinse again with plain water. This step is particularly effective for restoring the shine to stainless steel and aluminum trays.
Once you are satisfied that the grease has been lifted, rinse the baking tray thoroughly under hot, running water. Ensure all traces of the baking soda paste are washed away. For an extra touch of brilliance and to neutralize any remaining alkaline residue from the baking soda, you can perform a quick vinegar rinse. Lightly spray the tray with white vinegar or wipe it down with a vinegar-soaked cloth. The mild acidity of the vinegar will react with any leftover baking soda, creating a fizzing action that lifts away the final microscopic particles of dirt. Rinse again with plain water. This step is particularly effective for restoring the shine to stainless steel and aluminum trays.
Once you are satisfied that the grease has been lifted, rinse the baking tray thoroughly under hot, running water. Ensure all traces of the baking soda paste are washed away. For an extra touch of brilliance and to neutralize any remaining alkaline residue from the baking soda, you can perform a quick vinegar rinse. Lightly spray the tray with white vinegar or wipe it down with a vinegar-soaked cloth. The mild acidity of the vinegar will react with any leftover baking soda, creating a fizzing action that lifts away the final microscopic particles of dirt. Rinse again with plain water. This step is particularly effective for restoring the shine to stainless steel and aluminum trays.
Step 6: Dry Completely and Season (For Aluminum Trays)
Never put a damp baking tray away, as moisture can lead to rust (on certain materials) and water spots. Use a clean, dry microfiber cloth to thoroughly dry the tray immediately after washing. If you are cleaning uncoated aluminum half-sheet pans, deep cleaning can sometimes strip away their natural non-stick properties. To restore this, you can “season” the pan lightly. Rub a microscopic layer of neutral high-heat oil (like canola or grapeseed oil) over the surface and bake the empty tray at a low temperature (around 250°F) for 20-30 minutes. This polymerizes a fresh, clean layer of oil onto the pan, protecting the metal and providing a slightly non-stick surface for your next baking endeavor.
Never put a damp baking tray away, as moisture can lead to rust (on certain materials) and water spots. Use a clean, dry microfiber cloth to thoroughly dry the tray immediately after washing. If you are cleaning uncoated aluminum half-sheet pans, deep cleaning can sometimes strip away their natural non-stick properties. To restore this, you can “season” the pan lightly. Rub a microscopic layer of neutral high-heat oil (like canola or grapeseed oil) over the surface and bake the empty tray at a low temperature (around 250°F) for 20-30 minutes. This polymerizes a fresh, clean layer of oil onto the pan, protecting the metal and providing a slightly non-stick surface for your next baking endeavor.
Never put a damp baking tray away, as moisture can lead to rust (on certain materials) and water spots. Use a clean, dry microfiber cloth to thoroughly dry the tray immediately after washing. If you are cleaning uncoated aluminum half-sheet pans, deep cleaning can sometimes strip away their natural non-stick properties. To restore this, you can “season” the pan lightly. Rub a microscopic layer of neutral high-heat oil (like canola or grapeseed oil) over the surface and bake the empty tray at a low temperature (around 250°F) for 20-30 minutes. This polymerizes a fresh, clean layer of oil onto the pan, protecting the metal and providing a slightly non-stick surface for your next baking endeavor.
⚠️ What NOT to Do When Cleaning Baking Trays
- Do NOT use bleach on aluminum: Chlorine bleach causes a chemical reaction that will permanently pit, discolor, and destroy aluminum baking sheets.
- Do NOT use steel wool on non-stick surfaces: Abrasive scourers like steel wool will instantly scratch and ruin the Teflon or non-stick coating on your trays, making them unsafe to use.
- Do NOT soak non-stick trays overnight: Prolonged soaking can cause the non-stick coating to degrade or peel away from the metal base.
- Do NOT put uncoated aluminum in the dishwasher: The harsh detergents and extreme heat of a dishwasher will oxidize aluminum, turning it dull, chalky, and dark gray.
Different Tray Types: Specialized Cleaning Advice
Not all baking trays are created equal, and understanding the material of your specific pan is essential for choosing the correct cleaning method. Here is a breakdown of how to handle different types of baking trays:
- Aluminum Trays: The standard workhorse of professional kitchens. They are durable and conduct heat beautifully. The baking soda and peroxide method works exceptionally well on aluminum. Just remember to avoid bleach and dishwashers, as these will ruin the finish.
- Non-Stick Trays: These require a gentler touch. The baking soda paste is safe, but you must only use a soft sponge or a non-scratch scrub pad. Avoid any aggressive scrubbing, and never use metal utensils to scrape off burnt food.
- Stainless Steel Trays: Highly resistant to rust and scratching. You can be more aggressive with stainless steel. Barkeepers Friend is also an excellent alternative for these trays if the baking soda method isn’t quite enough.
- Glass Bakeware (Pyrex): Glass is incredibly durable and can withstand heavy scrubbing. The baking soda paste works wonders on baked-on grease in the corners of glass dishes. You can also safely soak glass bakeware for extended periods.
Maintenance Tips for Keeping Trays Clean
- Always Line Your Trays: The absolute best way to keep your baking trays clean is to prevent them from getting dirty in the first place. Always line your trays with high-quality parchment paper or a reusable silicone baking mat (like a Silpat) before roasting vegetables or baking cookies.
- Clean Immediately After Use: Don’t let grease sit and harden. As soon as the tray is cool enough to handle, wash it with hot, soapy water. This prevents the oils from polymerizing and bonding to the metal.
- Avoid Cooking Spray on Non-Stick: Aerosol cooking sprays contain propellants and emulsifiers that can build up on non-stick surfaces, creating a sticky residue that is notoriously difficult to remove. Use regular oil or butter instead.
❓ Frequently Asked Questions
Can I use oven cleaner to clean my baking trays?
Generally, it is not recommended to use oven cleaner on baking trays, particularly aluminum or non-stick ones. Oven cleaners contain harsh caustic chemicals (like lye) that can severely pit, discolor, and damage aluminum, and strip the coating off non-stick pans. It is safer to stick with the baking soda and peroxide method.
How do I clean burnt sugar off a baking tray?
Burnt sugar can be incredibly stubborn. The best approach is to cover the burnt sugar with boiling water and let it soak. The hot water will eventually dissolve the sugar crystals. If any residue remains, apply the baking soda paste and scrub gently.
Are baking trays dishwasher safe?
It depends entirely on the material. Uncoated aluminum should never go in the dishwasher, as the detergent will oxidize it. Non-stick trays are sometimes labeled dishwasher safe, but hand washing is always recommended to prolong the life of the coating. Stainless steel and glass are generally dishwasher safe.
How often should I deep clean my baking trays?
If you use parchment paper or silicone mats, you may only need to deep clean your trays every few months. However, if you regularly roast directly on the metal, a deep clean with baking soda and peroxide every 3-4 weeks will keep the polymerized grease from building up uncontrollably.
Baking soda vs. Bar Keepers Friend: Which is better?
Both are excellent cleaners. Baking soda and peroxide are ideal for heavy, sticky grease buildup and are generally safer for non-stick surfaces (when scrubbed lightly). Bar Keepers Friend (which contains oxalic acid) is superior for removing rust, hard water stains, and restoring the bright finish to stainless steel, but it is too abrasive for non-stick coatings.
Can I use this method on cookie sheets?
Yes! “Baking tray,” “baking sheet,” and “cookie sheet” are often used interchangeably. The baking soda and hydrogen peroxide paste is perfectly safe and effective for flat cookie sheets, rimmed baking sheets (half-sheet pans), and jelly roll pans.
How can I remove rust from my baking trays?
If your baking tray has developed rust spots, the baking soda method may not be enough. Instead, use a mild abrasive like Bar Keepers Friend, or try scrubbing the rust spot with half a potato dipped in baking soda or coarse salt. The oxalic acid in the potato combined with the abrasive salt helps lift rust effectively. Dry thoroughly after cleaning.
✅ Bottom Line
Learning how to clean baking trays doesn’t require expensive commercial chemicals or hours of backbreaking labor. By utilizing the simple, inexpensive combination of baking soda, hydrogen peroxide, and a dash of dish soap, you can cut through the toughest baked-on grease and restore your kitchenware. Remember to tailor your cleaning approach to the specific material of your tray—avoiding abrasives on non-stick and bleach on aluminum—and implement preventative measures like parchment paper to keep your trays looking pristine for years of delicious baking and roasting.