⚡ Quick Answer: How to Clean a Burnt Griddle
The most effective way to restore a burnt griddle is the three-step salt, vinegar, and toothpaste method:
- Step 1: While the griddle is warm (not blazing hot), pour 1/2 cup of coarse kosher salt over the burnt areas and scrub with a paper towel or grill brick to abrade the carbon.
- Step 2: Pour 1/4 cup of distilled white vinegar over the salted surface. The chemical reaction lifts polymerized grease and mineral deposits.
- Step 3: After wiping clean, apply a dab of whitening toothpaste (which contains mild abrasives and surfactants) to stubborn chrome or stainless steel spots, scrub gently, and rinse thoroughly.
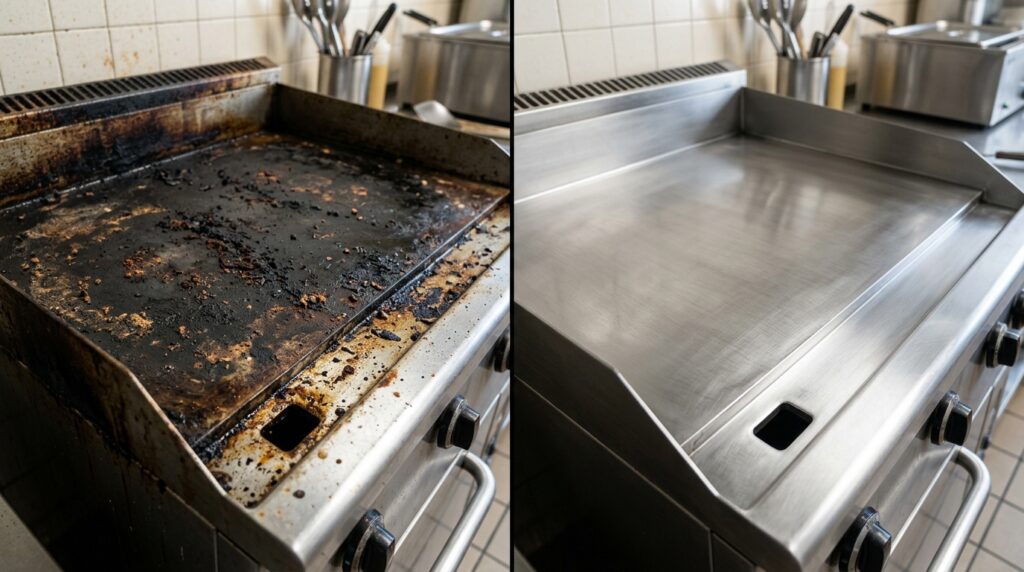
If you are staring down at a blackened, crusty, completely burnt griddle surface, do not panic. Figuring out exactly how to clean a burnt griddle is a right of passage for any flat top owner. Whether you accidentally left the burners on high, cooked a sugary marinade that turned into pure carbon, or neglected your Blackstone for an entire season, we have the ultimate burnt griddle cleaning hack using salt, vinegar, and toothpaste.
You might be wondering: why use toothpaste? Or why use salt when you could just blast it with harsh chemical oven cleaners? The truth is, the cooking surface of your griddle—be it cast iron, carbon steel, or stainless steel—needs to be treated with respect. Harsh chemicals can pit the metal, destroy your hard-earned seasoning, or worse, leave toxic residue on the surface where you cook your family’s pancakes and smash burgers.
In this exhaustive 2026 guide, we are going to dive deep into the exact science of carbon buildup, polymerized grease, and food residue that carbonizes. We will explore the salt scrub method in meticulous detail, the vinegar soak method, and the surprising burnt griddle cleaning hack using toothpaste that will leave your stainless steel and chrome surfaces gleaming like mirrors.
We will also cover alternative methods, from the hot water deglaze technique to baking soda pastes, and provide specific instructions for cleaning a Blackstone griddle, restoring a cast iron griddle, and safely cleaning an electric griddle that cannot be submerged in water. Prepare yourself for the most comprehensive griddle cleaning tutorial on the internet.
- Why Do Griddles Get Burnt So Easily?
- The ULTIMATE Combo Method: Salt, Vinegar & Toothpaste
- Alternative Cleaning Methods for Burnt Griddles
- Specific Griddle Types: Tailoring Your Approach
- The Crucial Final Step: Re-Seasoning Your Griddle
- ❓ Frequently Asked Questions
- The Science Behind the Griddle Seasoning Process
- Troubleshooting Common Griddle Cleaning Problems
- Advanced Griddle Maintenance: The Professional Chef’s Approach
- Author
Why Do Griddles Get Burnt So Easily?
To understand how to clean a burnt griddle, you first need to understand the chemistry of what is happening on that metal surface. When you cook on a griddle, you are dealing with high, intense, direct heat. Several scientific processes occur simultaneously that can lead to a disastrous, crusty black mess if left unchecked.
1. Carbonization of Food Residue: When food particles, particularly those containing sugars (like barbecue sauces, teriyaki glazes, or caramelized onions) or proteins (like burger drippings or bacon bits), are left on the hot surface, the heat rapidly drives off their moisture. Once the moisture is gone, the organic compounds begin to break down thermally, a process known as pyrolysis. Eventually, all that is left is pure carbon. This carbon bonds tenaciously to the microscopic pores of the metal.
2. Polymerization of Fats and Oils: This is a double-edged sword. Polymerization is the exact process we want when we are seasoning a griddle. When oil is heated past its smoke point, the fatty acid chains break down and recombine into a hard, slick, plastic-like polymer coating. However, when there is too much oil, or when the oil mixes with food debris and is exposed to inconsistent heat, this polymerization becomes uneven. Instead of a smooth non-stick layer, you get a sticky, gummy, or eventually rock-hard blackened crust that traps new food particles.
3. Thermal Shock and Burn-On: Sometimes, cold food is thrown onto a smoking hot griddle. The drastic temperature change can cause sugars and proteins to seize and instantly fuse to the metal before the Maillard reaction can create a non-stick crust on the food itself. This results in instant, severe sticking and burning.
🧹 What You Need (Exact Measurements)
Gather these supplies before you begin the ultimate cleaning method. Precision matters when dealing with stubborn carbon.
- Coarse Kosher Salt (1/2 cup): Must be coarse. Table salt is too fine and will dissolve or lack the abrasive edges needed to cut through carbon.
- Distilled White Vinegar (1/4 cup): A 5% acidity level is perfect for breaking down alkaline mineral deposits and cutting grease.
- Whitening Toothpaste (2 tablespoons): Choose a plain white paste, not a gel. The baking soda, silica, and mild surfactants are key.
- Warm Water (1 cup): For deglazing and final rinsing.
- High-Smoke-Point Oil (3 tablespoons): Canola, grapeseed, or flaxseed oil for re-seasoning.
- Tools: A heavy-duty metal griddle scraper (or putty knife), a pumice griddle brick or chainmail scrubber, tongs, and a thick stack of heavy-duty paper towels.
The ULTIMATE Combo Method: Salt, Vinegar & Toothpaste
If you want to know how to clean a burnt griddle effectively, this three-stage combination method is the holy grail. It utilizes mechanical abrasion (salt), chemical dissolution (vinegar), and micro-polishing (toothpaste) to attack the burnt-on mess from every possible angle. This is the burnt griddle cleaning hack toothpaste enthusiasts have been raving about.
Phase 1: The Coarse Salt Scrub (Mechanical Abrasion)
The first step is all about heavy lifting. Coarse kosher salt is an incredible cleaning agent for cooking surfaces. The large, jagged crystals act like tiny scrub brushes. Because salt is a mineral, it is hard enough to scrape away carbonized food, but it is softer than cast iron, carbon steel, or stainless steel, meaning it will not gouge or permanently scratch your griddle surface.
1. Warm up the griddle: Turn your burners on low. You want the surface to be warm to the touch (around 150°F to 200°F). Heat softens polymerized grease, making the carbon crust slightly pliable. If the griddle is blazing hot, the salt will just bounce off, and you’ll burn your hands. If it is stone cold, the grease will be rock hard.
2. Apply the salt: Evenly distribute exactly 1/2 cup of coarse kosher salt directly over the most heavily burnt areas. Do not be stingy. You need a thick layer of abrasive material.
3. Scrub vigorously: Take a wad of heavy-duty paper towels, grab them with your metal tongs, and use them to scour the salt into the burnt crust. Apply firm, downward pressure in a circular motion. You will see the crisp white salt quickly turn brown, then black, as it absorbs the loose grease and breaks away the carbon.
4. Scrape it away: Use your metal griddle scraper to push the blackened, dirty salt into the grease trough. Your griddle should already look 50% better.
Phase 2: The Vinegar Deglaze (Chemical Dissolution)
Now that the bulky carbon crust is gone, we need to address the microscopic layer of sticky, rancid polymerized oil and mineral scale. This is where the phrase ‘clean griddle with salt and vinegar’ truly shines. Distilled white vinegar is a mild acetic acid (usually around 5% concentration).
When you pour vinegar onto a warm metal surface, a few things happen. First, the rapid evaporation of the water content in the vinegar creates steam, which physically lifts debris from the metal pores. Second, the acetic acid chemically attacks alkaline deposits and breaks the bonds of stubborn grease.
1. Keep the griddle warm: Ensure the surface is still moderately warm.
2. Pour the vinegar: Carefully pour 1/4 cup of distilled white vinegar across the surface. It will hiss, bubble, and steam immediately. This is the deglazing action.
3. Work the liquid: Using your metal scraper or a chainmail scrubber, agitate the bubbling vinegar across the surface, paying special attention to the corners and edges where old grease loves to hide.
4. Wipe clean: Use clean paper towels (again, held with tongs) to wipe up the dirty vinegar solution. The surface should now feel smooth to the touch, with no sticky residue.
Phase 3: The Toothpaste Polish (Micro-Abrasion & Surfactants)
This is the secret weapon. You might think toothpaste is just for teeth, but standard whitening toothpaste is an exceptionally engineered cleaning compound. It contains mild abrasives (like hydrated silica or calcium carbonate) that are fine enough to polish tooth enamel without scratching it. It also contains surfactants (like sodium lauryl sulfate) which foam up and trap microscopic dirt particles.
When dealing with a stainless steel flat top, chrome-plated griddle, or even smoothing out a cast iron surface, toothpaste provides the final, glass-like finish. It removes the shadowy ‘ghost’ stains left behind by extreme heat.
1. Cool the griddle: Turn off the heat completely. The griddle must be cool enough to touch safely, otherwise, the toothpaste will instantly burn and create a worse mess.
2. Apply the paste: Squeeze about 2 tablespoons of plain whitening toothpaste (do NOT use gel toothpaste or anything with heavy breath-freshening crystals) directly onto the remaining stained areas.
3. Buff it in: Use a damp microfiber cloth or a soft, damp sponge to work the toothpaste into the metal using tight, circular polishing motions. You will see the paste turn grey as it lifts oxidized metal and microscopic carbon dust.
4. Thorough rinse: This is critical. You must remove all toothpaste residue, or your next meal will taste incredibly minty. Pour 1 cup of warm water over the surface and wipe aggressively with clean paper towels until absolutely no white residue remains. Dry completely.
⚠️ What NOT To Do: Avoid These Griddle Disasters
One wrong move can ruin your expensive griddle permanently. Never do the following:
- NEVER use soap on seasoned cast iron or carbon steel: Dish soap contains aggressive degreasers that will strip your hard-earned polymer seasoning right off the metal, exposing it to instant rust. (Unless you are intentionally stripping it down to bare metal to restart).
- NEVER submerge an electric griddle: The heating elements and electrical housings are not waterproof. You will short out the appliance and risk electrocution.
- NEVER pour cold water on a blazing hot cast iron surface: The extreme thermal shock can actually warp the metal or cause a heavy cast iron plate to crack cleanly in half. Always use warm water on a warm griddle.
- NEVER use metal scrapers on Teflon/Non-stick griddles: If you have an indoor non-stick electric griddle, metal tools will scratch the toxic Teflon coating, ruining the pan and contaminating your food.
- NEVER leave it unseasoned after deep cleaning: Stripping the carbon also strips the protective oil layer. Failing to re-season immediately guarantees flash rust overnight.
Alternative Cleaning Methods for Burnt Griddles
While the salt, vinegar, and toothpaste trick is incredibly effective, different situations might call for different tactics. Here is a breakdown of other highly successful methods for tackling a burnt griddle, depending on the severity of the mess and the material of your cooking surface.
The Hot Water Deglaze Technique (For Daily Maintenance)
This is the method you should be using immediately after cooking, before the food has a chance to turn into a cement-like crust. Professional short-order cooks use this technique hundreds of times a day.
While the griddle is still quite hot (but the burners are off), slowly pour a stream of warm water directly onto the cooked-on food residue. The water will instantly flash to steam. This violent phase change from liquid to gas creates immense upward pressure, literally blowing the stuck-on food off the surface of the metal. Quickly follow with a metal scraper, pushing the watery, greasy slurry into the grease trap. Wipe dry with paper towels and apply a whisper-thin layer of oil.
The Baking Soda Paste Method (For Stubborn Grease)
If you don’t have coarse salt, baking soda (sodium bicarbonate) is a fantastic alternative. It is a mild abrasive, but its true power lies in its alkalinity. Burnt-on grease and food are often slightly acidic. The highly alkaline nature of baking soda helps to saponify (turn into soap) the greasy residues.
Mix 1/2 cup of baking soda with just enough water (about 2-3 tablespoons) to form a thick, frosting-like paste. Spread this paste thickly over the cold, burnt griddle surface. Let it sit for at least 30 minutes, or even overnight for severe burns. The paste will absorb the grease and loosen the carbon bonds. Come back with a non-scratch scrub sponge and work the paste away. Rinse thoroughly with warm water. For more tips on this, check out our guide on how to clean a greasy flat top griddle.
The Lemon and Salt Method (For Stainless Steel)
Stainless steel griddles are gorgeous, but they show heat tinting and carbon shadows very easily. The combination of coarse salt (abrasive) and lemon juice (citric acid) is perfect for restoring the shine to stainless steel without damaging it.
Cut a large lemon in half. Sprinkle 1/4 cup of coarse salt over the burnt stainless steel. Use the cut, fleshy side of the lemon half as your scrubbing pad. Squeeze slightly as you scrub to release the acidic juice. The citric acid cuts through oxidation and grease, while the salt provides the scrubbing power. The lemon rind also leaves behind a pleasant, clean scent, completely neutralizing old fish or onion odors.
Using a Griddle Brick or Pumice Stone (For Extreme Carbon)
When you are dealing with a commercial-grade griddle, or a Blackstone that hasn’t been cleaned in two years, you need heavy artillery. A griddle brick, also known as a grill brick, is a block of pumice stone. Pumice is a volcanic rock that is highly abrasive but still softer than iron or steel.
To use a griddle brick, pour a generous amount of cooking oil (about 1/4 cup) onto a warm griddle. The oil acts as a lubricant so you don’t aggressively gouge the metal. Place the flat face of the griddle brick onto the oily surface and scrub back and forth with heavy pressure. The brick will slowly disintegrate as you scrub, creating a thick, black, gritty paste of oil, pumice dust, and carbon. Scrape this paste away, wipe completely clean with paper towels, and repeat until the metal is exposed.
Specific Griddle Types: Tailoring Your Approach
How to Clean a Burnt Blackstone Griddle
Blackstone griddles are made of cold-rolled carbon steel. They season very much like cast iron, meaning they build up a polymerized layer of oil that makes them naturally non-stick. When you burn a Blackstone, you are often burning that seasoning layer along with the food.
To clean a heavily burnt Blackstone, start with the metal scraper to remove the loose chunks. Then, use the salt and oil scrub method. Pour 1/2 cup of oil and 1/2 cup of coarse salt on the warm surface and scrub with a grill stone or chainmail. Crucial step: Because you are stripping down the carbon steel, you MUST re-season the Blackstone immediately after cleaning, or it will flash-rust within hours. Heat the clean griddle to high, apply a microscopic layer of Blackstone seasoning conditioner or flaxseed oil, and let it smoke off. Repeat 3-4 times until a dark, black, slick surface is restored.
Cleaning a Burnt Cast Iron Griddle
Cast iron is incredibly durable but very porous. It holds onto flavors, but unfortunately, it also holds onto carbonized food deep within its microscopic grain. If your cast iron griddle is flaking black specks into your pancakes, it’s time for a deep clean.
For cast iron, avoid the vinegar soak if possible, as prolonged exposure to acid can eat away at the iron itself. Stick to the heavy salt scrub. If the burn is catastrophic, you may need to strip the cast iron completely and start over. You can read our full tutorial on how to restore rusty cast iron for the extreme stripping methods. Once clean, bake a layer of oil into the iron in a 400°F oven to rebuild that essential patina.
How to Clean an Electric Griddle
Electric griddles pose a unique challenge. You cannot take them to the sink and hose them down, nor can you soak them, because the electrical plug housing and internal heating coils will be destroyed by water. Furthermore, many indoor electric griddles have a non-stick Teflon coating, meaning metal scrapers, pumice stones, and harsh salt scrubs are completely off-limits.
For a burnt non-stick electric griddle, unplug the unit while it is still slightly warm. Use a damp microfiber cloth to gently steam away the residue. For stubborn burns, apply a paste of baking soda and water (using the method described above) and scrub gently with a soft nylon bristle brush or a silicone scraper. Never use abrasive sponges (like the green side of a Scotch-Brite pad), as they will permanently scratch the non-stick surface.
🛡️ Maintenance & Prevention: Keep It Like New
A clean griddle is a happy griddle. Follow these daily habits to prevent carbon disasters before they happen.
- The Daily Wipe-Down: After every single cook, while the griddle is cooling but still warm, scrape away debris, deglaze with a squirt of warm water, and wipe completely dry. Never leave it dirty overnight.
- The Protective Oil Layer: Before putting your griddle away, spread a dime-sized amount of high-smoke-point oil (like canola) over the entire surface using a paper towel. This creates a barrier against oxygen and moisture, preventing rust.
- Master Temperature Control: The #1 reason griddles burn is cooking on too high of heat. Most griddle cooking (eggs, bacon, smash burgers, pancakes) should be done on medium-low to medium heat (300°F – 375°F). High heat burns sugars instantly.
- Use the Right Oil: Avoid cooking with butter or extra virgin olive oil if you are using high heat. The milk solids in butter and the low smoke point of EVOO will burn rapidly, leaving a sticky black residue. Use clarified butter (ghee), avocado oil, or canola oil.
- Invest in a Silicone Mat: If you keep your outdoor griddle on a patio, invest in a heavy-duty silicone cover mat that sits directly on the cooking surface. It keeps bugs, pollen, and moisture off the metal between cooks.
The Crucial Final Step: Re-Seasoning Your Griddle
We cannot emphasize this enough: if you have aggressively cleaned your carbon steel or cast iron griddle using salt, vinegar, pumice, or intensive scrubbing, you have almost certainly stripped away the protective polymer seasoning. If you leave it bare, it will begin to rust from the humidity in the air within hours. Re-seasoning is mandatory.
1. Ensure the griddle is 100% dry. Heat it on high for 10 minutes to boil off any microscopic moisture trapped in the metal pores.
2. Apply a very thin layer of high-smoke-point oil (flaxseed, canola, or grapeseed). We are talking a microscopic layer. Wipe it on with a paper towel, and then use a clean paper towel to try and wipe it all off. If the oil pools or looks wet, it is too thick and will turn into a sticky gummy mess, ruining your hard work.
3. Let the griddle rip on high heat until the oil begins to smoke vigorously. Wait until the smoke completely stops (usually 10-15 minutes). The surface will transform from a wet gloss to a hard, matte black finish.
4. Repeat this incredibly thin oil application and smoke-off process 3 to 5 times. You are building microscopic layers of tough polymer plastic. Your griddle is now perfectly restored, protected, and incredibly non-stick.
If you are dealing with other barbecue equipment that looks like a war zone, apply similar principles. You can read our detailed guide on how to clean a greasy BBQ grill top or tackle indoor messes with our tutorial on cleaning a burnt greasy oven tray.
❓ Frequently Asked Questions
Can I use regular table salt instead of coarse kosher salt?
No, we do not recommend it. Table salt is too finely ground. It dissolves much faster when it hits grease or moisture, and it lacks the large, sharp, jagged edges needed to physically scrape and abrade the burnt carbon off the metal. Always use coarse kosher salt or coarse sea salt.
Does toothpaste actually scratch stainless steel griddles?
If you use a standard, non-gel whitening toothpaste, it is perfectly safe. The abrasives in toothpaste (hydrated silica) are specifically engineered to be softer than tooth enamel. Since stainless steel is significantly harder than tooth enamel, the toothpaste acts as an ultra-fine polishing compound, lifting stains without leaving visible scratches.
How often should I deep clean my griddle with this method?
The aggressive salt, vinegar, and toothpaste method should be reserved for deep restorative cleaning—perhaps once or twice a year at the start or end of the cooking season, or after a catastrophic culinary failure. For daily use, stick to the simple hot water deglaze and a light wipe-down.
Can I use apple cider vinegar instead of white vinegar?
While apple cider vinegar contains acetic acid and will technically work, it is less ideal. It contains fruit sugars and organic compounds that can leave a sticky residue behind when heated on the griddle. Stick to plain, distilled white vinegar for cleaning purposes, as it evaporates cleanly.
Why is my griddle surface sticky after I cleaned and oiled it?
A sticky griddle surface means you applied too much oil during the re-seasoning process, or you did not heat the oil high enough or long enough for it to fully polymerize. The oil partially broke down but never cured. You will need to scrape the sticky layer off and re-season with paper-thin layers of oil, ensuring each layer smokes off completely.
Is it safe to use oven cleaner on a cast iron griddle?
Technically yes, if you are attempting to completely strip 100% of the seasoning down to the bare, raw metal (often done with heavily rusted vintage pans). However, for routine cleaning of a burnt spot, oven cleaner (lye) is far too aggressive and toxic. It will destroy the seasoning you have worked hard to build. The natural salt and vinegar method is much safer for cooking surfaces.
What is the best oil to use for seasoning after cleaning?
You want an oil with a high smoke point and high polyunsaturated fat content, as these polymerize the best. Flaxseed oil creates the hardest, most durable coating, but it can be brittle. Grapeseed oil, canola oil, and specialized griddle conditioning pastes are excellent, readily available alternatives.
The Science Behind the Griddle Seasoning Process
To truly master flat top cooking and maintenance, you have to embrace the chemistry. When you look at a polished carbon steel or cast iron griddle under a microscope, it is not perfectly flat. It looks like a jagged mountain range of peaks and valleys, pores, and microscopic fissures. If you were to cook directly on this raw metal, proteins (like eggs or lean meat) would chemically bond to the iron atoms in a process that makes them nearly impossible to scrape off without ripping the food apart.
This is why we ‘season’ the metal. Seasoning is not about flavor; it is about creating a protective, non-stick polymer shield. When you apply liquid oil (which consists of long chains of fatty acids) to the metal and heat it past its smoke point, a remarkable transformation occurs. The heat causes the unstable fatty acid chains to break apart and cross-link with each other, forming massive, tightly woven molecular networks. This process is called polymerization.
As these polymers form, they bake directly into the microscopic valleys and pores of the metal, filling them in and creating a smooth, plastic-like shell over the jagged iron peaks. This new layer is slick, hydrophobic (water-repellent), and highly resistant to sticking. Every time you cook with oil, you are theoretically adding a microscopic layer to this seasoning, making the griddle better over time.
However, when you burn a griddle badly, you are often burning organic food matter (carbon) directly into this polymer layer, or you heat the polymer layer so aggressively that it turns into ash. This is why our salt, vinegar, and toothpaste method is so vital. The salt physically grinds the top layer of ruined carbon/polymer away. The vinegar dissolves the acidic bonds of rancid fats. The toothpaste polishes out the microscopic soot from the valleys. You are essentially resetting the playing field so you can build a fresh, flawless layer of polymerization.
Troubleshooting Common Griddle Cleaning Problems
Even with the best intentions and the right methods, things can go sideways. Here are a few common issues people run into when trying to clean a severely burnt flat top, and exactly how to fix them.
Problem: The rust returns immediately after cleaning. This is known as ‘flash rusting.’ It happens when you strip the griddle down to bare iron or carbon steel, and the ambient humidity in the air attacks the unprotected metal. Solution: Speed is key. The moment you finish your final water rinse and wipe-down, the griddle needs to go over heat to evaporate all moisture, and oil must be applied within minutes. Never leave a freshly stripped griddle bare for more than 5 minutes.
Problem: The griddle is flaking black chips into the food. This happens when the seasoning layer gets too thick and brittle, usually from applying oil too heavily, or when a layer of carbon is trapped underneath a layer of seasoning. The heat causes the metal to expand, cracking the brittle shell. Solution: You need to aggressively scrape the flaking areas with a putty knife and then use the salt and pumice brick method to grind the area flat and smooth before re-seasoning.
Problem: The center is clean but the corners are chronically sticky. The corners of a griddle rarely get as hot as the center. Oil and grease pushed to the corners never reach the smoke point required to polymerize; instead, they just congeal into a sticky, gummy varnish. Solution: Focus your vinegar deglazing heavily on the corners. You may need to use a specialized degreaser for these non-cooking zones, then wipe clean thoroughly.
✅ The Bottom Line
A severely burnt griddle looks like a disaster, but it is rarely permanent. By leveraging the mechanical scrubbing power of coarse salt, the chemical breakdown of white vinegar, and the micro-polishing finish of whitening toothpaste, you can completely resurrect any cast iron, carbon steel, or stainless surface. Remember that stripping the carbon also strips the protection—always take the time to properly re-season your griddle with high-heat oil immediately after a deep clean. Respect the metal, maintain your seasoning, and your flat top will reward you with decades of perfect cooks.
Advanced Griddle Maintenance: The Professional Chef’s Approach
If you want to take your griddle care to the next level, it is worth looking at how professional short-order cooks and teppanyaki chefs maintain their massive commercial flat tops. These surfaces see more abuse in a single weekend than a home griddle sees in a decade. Their secret is a combination of specialized tools and a rigid, non-negotiable cleaning schedule.
In a commercial kitchen, the cleaning process at the end of the night is a sacred ritual. The chef will turn off the burners but leave the griddle hot. They start with a heavy-duty scraper, moving in long, even strokes from the back of the griddle to the front grease trough. They aren’t just scraping; they are applying significant downward pressure to sheer off microscopic layers of carbonized proteins.
Next comes the grill screen and grill pad. This is a system where a highly abrasive screen (like heavy-duty sandpaper for metal) is attached to a handle over a scrubbing pad. The chef pours a commercial griddle cleaner—or in a pinch, our trusty high-heat oil and coarse salt mix—and aggressively works the screen over the entire surface until the dark brown patina gives way to bright, shining steel.
Finally, the deglazing step. Instead of just water or vinegar, some chefs use club soda. The carbonation and mild alkalinity in club soda provide an incredible lifting action when it hits the hot metal. They pour it on, the surface erupts in steam, and they squeegee the resulting liquid into the trap. The final step is always a thin coat of fresh oil, spread perfectly even with a folded towel. By adopting even a fraction of this professional rigor—specifically the immediate hot scraping and the relentless re-oiling—you will ensure your backyard or kitchen griddle remains in pristine, stick-free condition forever.