- The Quick Answer: How to Clean Grout with Baking Soda and Hydrogen Peroxide (No Scrubbing)
- Understanding Your Enemy: Why Does Grout Get So Dirty and Discolored?
- The Science: How Baking Soda and Hydrogen Peroxide Work Together
- The Step-by-Step Method: How to Clean Grout with Baking Soda (Floor Edition)
- The Spray Bottle Method: Tackling Wall Grout and Showers
- Floor Grout vs. Wall Grout vs. Shower Grout: Key Differences
- Colored Grout Considerations: Will Baking Soda Bleach My Grout?
- Using a Steam Cleaner on Grout: The Ultimate Tag Team
- Commercial Products vs. Natural Methods: Which is Actually Better?
- When is Grout Too Far Gone? (Knowing When to Regrout)
- Bonus Section: Advanced Troubleshooting for the Toughest Stains
- The Evolution of Grout: Why Cleaning Has Changed
- Author
The Quick Answer: How to Clean Grout with Baking Soda and Hydrogen Peroxide (No Scrubbing)
To completely clean grout with baking soda without heavy scrubbing, mix 1/2 cup of baking soda with 1/4 cup of hydrogen peroxide and 1 teaspoon of liquid dish soap to form a thick paste. Apply this paste directly to your dirty grout lines. The real secret to the “no scrubbing” method is time—let the mixture sit undisturbed for 15 to 20 minutes. The chemical reaction between the alkaline baking soda and the oxidizing hydrogen peroxide will bubble up and lift the dirt, mold, and discoloration to the surface. Finally, simply wipe away with a damp cloth or microfiber towel, and rinse with warm water.
If you are wondering how to clean grout with baking soda and actually see real results without breaking your back, you have come to the right place. Grout is notoriously one of the most frustrating surfaces in any home to keep clean. Whether it’s the kitchen backsplash, the bathroom floor, or the heavy-duty tiles in your shower enclosure, grout lines are basically dirt magnets. They trap moisture, invite mold, accumulate soap scum, and soak up spills like a sponge. For decades, the standard advice involved toxic smelling bleach pens, harsh acids, and hours of grueling scrubbing with a tiny toothbrush that left your knuckles raw and your back aching.
But there is a much better, scientifically proven way. The combination of baking soda (sodium bicarbonate) and hydrogen peroxide (H2O2) creates a powerful, oxygenating, bleaching, and lifting action that does the hard work for you. It is a completely natural, inexpensive, and eco-friendly alternative to commercial chemical cleaners. When combined properly, these two household staples create a bubbling reaction that breaks down organic matter, dissolves grease, kills mold spores, and lifts embedded dirt directly out of the microscopic pores of your grout.
In this ultimate, comprehensive guide, we will dive deep into the exact science of why grout gets so dirty, the precise recipe and application methods you need to use, how to adapt this method for different rooms (kitchens vs bathrooms, floors vs walls), and how to protect your freshly cleaned grout so you rarely have to do this again. We will also cover essential topics like colored grout considerations, how this compares to steam cleaning, and when it is time to throw in the towel and just regrout. Grab your ingredients, and let’s transform those dingy lines back to bright, pristine white.
Understanding Your Enemy: Why Does Grout Get So Dirty and Discolored?
Before we can effectively clean grout with baking soda, it helps to understand exactly what grout is and why it behaves the way it does. Grout is a mixture of water, cement, and sand. While the ceramic or porcelain tiles surrounding it are glazed, fired, and completely waterproof (non-porous), the grout itself is incredibly porous. On a microscopic level, grout looks like a rigid sponge. It is full of tiny holes, valleys, and crevices.
Because of this porous nature, anything that touches the grout can seep down into it. When you mop your floors with dirty mop water, the water evaporates, but the dirt is left behind in the pores of the grout. When you take a shower, dead skin cells, body oils, and soap scum wash down the walls and get caught in the grout lines. The bathroom environment, which is often warm and humid, creates the perfect breeding ground for mildew and mold to feed on these organic materials. That is why learning how to remove black mold from bathroom surfaces is such a common household chore.
Here is a breakdown of the primary culprits that ruin your grout’s appearance:
- Dirt and Soil: Found mostly on floor grout. Heavy foot traffic grinds microscopic dirt particles deep into the sandy texture of the grout. Over time, this turns light grout a dark, murky brown or black.
- Soap Scum and Body Oils: Found primarily in showers and bathtubs. Liquid soaps and shampoos contain animal fats or synthetic oils that cling to the unsealed grout, creating a yellowish, waxy buildup that attracts further dirt.
- Hard Water Minerals: Calcium and magnesium deposits from tap water dry onto the grout, leaving a chalky white or rusty orange residue depending on your water’s iron content.
- Mold and Mildew: Fungi thrive in dark, moist environments where there is organic matter to consume. The porous grout in a damp bathroom is an all-you-can-eat buffet for mold spores, resulting in black, pink, or green stains.
- Food Spills and Grease: Found on kitchen floors and backsplashes. Cooking oils aerosolize and settle on backsplashes, while spills on the floor quickly soak into the grout if not wiped immediately.
Because the contamination goes deeper than the surface, simply wiping the grout with a rag does nothing. You need a cleaning agent that can penetrate the pores, break down the bonds holding the dirt in place, and lift it to the surface. This is exactly where our hero ingredients come into play.
The Science: How Baking Soda and Hydrogen Peroxide Work Together
To truly appreciate how to clean grout with baking soda without scrubbing, we need a quick chemistry lesson. Why do these two specific ingredients work so much better than expensive commercial cleaners?
Baking Soda (Sodium Bicarbonate): Baking soda is a mild alkali (with a pH of around 8.1) and a very gentle abrasive. Because it is alkaline, it excels at dissolving dirt, grease, and proteins (like body oils or food spills) by turning them into soap-like substances that easily rinse away in water. Its mildly abrasive crystalline structure provides just enough physical friction to dislodge stubborn particles without scratching the surrounding tile or degrading the grout itself.
Hydrogen Peroxide (H2O2): Hydrogen peroxide is essentially water with an extra oxygen atom attached. It is a weak acid and a powerful oxidizing agent. When it comes into contact with organic matter (like mold, mildew, or dirt), it undergoes an oxidation reaction. It breaks down into water and oxygen gas. This rapid release of oxygen gas is what causes the characteristic bubbling or foaming action.
The Combination: When you mix the mild alkali (baking soda) with the oxidizing agent (hydrogen peroxide), you create a highly active, oxygenating bleaching paste. The hydrogen peroxide acts as a safe, color-safe bleach that lightens stains and kills bacteria and mold spores on contact. Meanwhile, the baking soda acts as a thickening agent (keeping the peroxide exactly where you put it instead of running down the drain) and helps cut through the greasy layers protecting the dirt. As the peroxide releases oxygen bubbles, these microscopic bubbles act like millions of tiny scrubbing brushes deep inside the pores of the grout, physically lifting the dirt to the surface. That is the secret to the “no scrubbing” promise.
🧹 What You Need Box: The Ultimate Grout Cleaning Kit
Gather these exact supplies before you begin to ensure the best results without any frantic mid-cleaning trips to the store.
- 1/2 cup Baking Soda: Fresh, standard household baking soda.
- 1/4 cup Hydrogen Peroxide: Standard 3% concentration (the kind found in a brown bottle at the pharmacy). Do not use higher concentrations without diluting.
- 1 teaspoon Liquid Dish Soap: Dawn dish soap is highly recommended due to its superior grease-cutting properties.
- Small Mixing Bowl and Spoon: For creating your paste.
- Small Application Brush: A designated grout brush, an old toothbrush, or even a small paintbrush to apply the paste precisely.
- Microfiber Cloths or Rags: For wiping away the lifted dirt.
- Spray Bottle (Optional but recommended): Filled with warm water for rinsing.
- Knee Pads or a Folded Towel: If you are working on the floor, protect your knees!
The Step-by-Step Method: How to Clean Grout with Baking Soda (Floor Edition)
Floor grout is usually the dirtiest because it endures constant foot traffic, spills, and the settling of airborne dust. To clean floor grout effectively with baking soda, you need to follow this precise sequence to maximize the chemical reaction and minimize your physical effort.
Step 1: Prep the Area
Never apply grout cleaner to a floor full of loose debris. Sweep or vacuum the floor thoroughly to remove all dust, pet hair, and loose crumbs. If you apply the paste over loose dirt, you will just create a muddy mess that pushes more dirt into the grout lines. After vacuuming, quickly wipe the floor with a damp mop just with plain hot water to remove surface stickiness, and let it dry completely.
Step 2: Mix the Magic Paste
In your small mixing bowl, combine the 1/2 cup of baking soda, 1/4 cup of hydrogen peroxide, and 1 teaspoon of liquid dish soap. Stir them together until they form a thick, cohesive paste. The consistency should be similar to toothpaste or cake frosting. If it is too runny, it will spread over the tiles and dry out too quickly; add more baking soda. If it is too thick, crumbly, or dry, add a splash more hydrogen peroxide until it reaches the correct texture.
Step 3: Apply Liberally to the Grout Lines
Using your small brush or an old toothbrush, scoop up the paste and apply it directly onto the grout lines. Do not worry about being perfectly neat, but try to keep the bulk of the paste on the grout rather than wasting it on the glazed tiles. Ensure the grout is completely covered with a thick layer of the mixture. Work in small sections (like a 3×3 foot area) so the paste doesn’t dry out completely before you get back to it.
Step 4: The Crucial “No Scrubbing” Wait Time
This is the most important step in learning how to clean grout with baking soda without scrubbing. Walk away. Leave the paste on the grout for a minimum of 15 minutes, up to 20 minutes. You will likely see the paste bubbling and fizzing slightly. This is the hydrogen peroxide reacting with the organic dirt and oxidizing it. The baking soda is actively breaking down the grease. If you scrub immediately, you are doing the work that the chemicals should be doing for you. Give the mixture the time it needs to lift the stains to the surface.
Step 5: Agitate (Optional) and Wipe Away
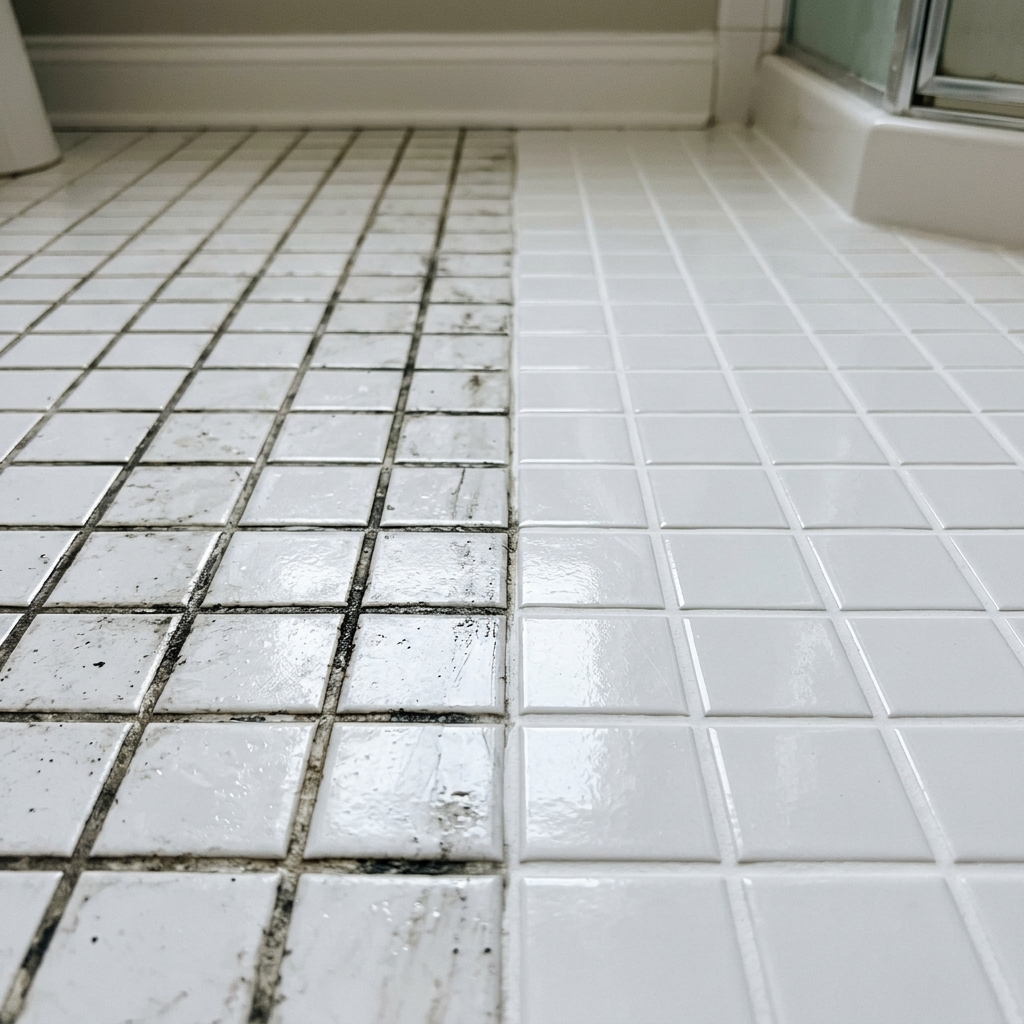
After 15-20 minutes, the dirt will be suspended in the paste. If your grout was severely stained, you might want to give it a very light, gentle pass with your soft brush—not a hard scrub, just a light agitation to loosen any last stubborn bits. Now, take a damp microfiber cloth and wipe away the paste. You will immediately see the stark contrast between the bright white cleaned grout and the dirty sections you haven’t touched yet.
Step 6: The Final Rinse
Baking soda can leave a white, powdery residue behind when it dries. To prevent your tiles from looking cloudy, you must rinse the floor well. The easiest method is to lightly spray the area with warm water and wipe it clean with a fresh, damp cloth. Alternatively, you can do a quick mop of the area with plain warm water. Let the floor air dry, or dry it with a towel to see the final, brilliant results immediately.
⚠️ What Not to Do Box: Dangerous Mistakes to Avoid
Protect your health and your home by avoiding these common grout cleaning catastrophes:
- NEVER Mix Hydrogen Peroxide with Vinegar: Mixing these two creates peracetic acid, which is highly corrosive, toxic, and can irritate your skin, eyes, and respiratory system.
- Avoid Using Bleach on Colored Grout: Chlorine bleach will strip the pigment right out of colored grout, leaving it splotchy and faded. Stick to oxygenating cleaners like peroxide.
- Don’t Use Stiff Wire Brushes: Steel wool or stiff wire brushes will scratch your tiles and physically gouge out chunks of the cement-based grout, ruining the structural integrity of your floor or wall.
- Never Skip the Wait Time: Impatience is the enemy of the “no scrub” method. If you wipe the paste off after 2 minutes, you will have to scrub vigorously to get any results.
The Spray Bottle Method: Tackling Wall Grout and Showers
Cleaning floor grout is relatively easy because gravity keeps your cleaning paste exactly where you put it. But what about vertical surfaces? The walls of your shower, the backsplash in your kitchen, or the tile surrounding your bathtub present a unique challenge. A thick paste will often just slide down the wall and end up in a useless clump on the floor or in the tub.
To effectively clean wall grout with baking soda, we need to alter our delivery method. The chemical reaction remains the same, but the application relies on a two-step process utilizing a spray bottle.
The Vertical Method Instructions:
First, you need to create a baking soda “paint.” Mix baking soda with just enough water to create a thick, sticky paste (do not use peroxide yet). The goal is to make it sticky enough that it adheres to the vertical grout lines without immediately running down. Using your fingers (wear gloves) or a small brush, press this water and baking soda paste directly into the vertical grout lines in your shower or backsplash.
Next, take a spray bottle and fill it with straight 3% hydrogen peroxide. Spray the peroxide heavily and directly onto the baking soda paste that is stuck to the wall. You will immediately see the intense bubbling reaction as the peroxide hits the baking soda. Because the baking soda was already pressed into the grout, the reaction happens exactly where it needs to—deep in the pores.
Let this mixture sit on the wall for 10-15 minutes. It will slowly drip down, which is unavoidable on vertical surfaces, but the initial chemical reaction will have done the heavy lifting of killing the mold and dissolving the soap scum. After the wait time, take your damp microfiber cloth or a shower squeegee and wipe down the walls, rinsing thoroughly with your showerhead to remove all the powdery residue. This method is incredibly effective for bathroom environments, much like our deep dive into mastering toilet cleaning and sanitization.
Floor Grout vs. Wall Grout vs. Shower Grout: Key Differences
Not all grout is created equal, and not all dirt is the same. Understanding what you are fighting will help you adjust your strategy when learning how to clean grout with baking soda.
Kitchen Floor Grout: This is typically the victim of grease, dropped food, and muddy shoes. The dish soap in our baking soda recipe is critical here. Dish soap contains surfactants designed specifically to bind with oils and fats and pull them away from surfaces. If your kitchen floor grout is particularly greasy, double the amount of dish soap in your paste recipe.
Bathroom Shower Grout: Shower grout battles hard water scaling, heavy soap scum, and black mold. The hydrogen peroxide is the star player in the shower. Peroxide destroys the cell walls of mold spores, preventing them from returning quickly. For severe hard water stains in the shower, you might need to use a slightly more acidic pre-treatment (like a brief vinegar soak, thoroughly rinsed away) before applying the alkaline baking soda paste, but remember never to mix them directly.
Entryway/Mudroom Grout: This area faces pure, abrasive dirt, sand, and salt (in winter months). The key here is vacuuming thoroughly before applying any wet cleaners. If you wet down sand and salt, you create an abrasive slurry that can scratch your tiles.
Colored Grout Considerations: Will Baking Soda Bleach My Grout?
A very common concern homeowners have is whether the powerful bleaching action of hydrogen peroxide will ruin their aesthetically pleasing dark grey, black, or custom-colored grout. This is a valid fear. Chlorine bleach (like Clorox) will absolutely destroy the pigment in colored grout, turning it splotchy, faded, and uneven.
However, hydrogen peroxide is an oxygen bleach, not a chlorine bleach. Oxygen bleach is generally considered “color-safe” for most applications, including dyed textiles and pigmented cement. That being said, because it is an oxidizing agent, there is always a very slight risk of lightening with repeated, heavy use over many years.
If you are cleaning dark or colored grout with baking soda and peroxide for the first time, you must perform a spot test. Find an inconspicuous area (like behind the toilet, under a rug, or in a dark corner of the kitchen) and apply the paste. Let it sit for the full 20 minutes, wipe it away, rinse, and let it dry completely. Grout always looks darker when wet, so you must wait until it is bone dry to accurately assess the color. If the color remains rich and unchanged, proceed with the rest of the floor. If you notice fading, you should switch to a neutral pH commercial stone and tile cleaner instead.
Using a Steam Cleaner on Grout: The Ultimate Tag Team
If you want to take your grout cleaning to an absolute professional, industrial level, combining the baking soda method with a household steam cleaner is the holy grail. Steam cleaners shoot superheated vapor (often over 200°F) at high pressure directly into the grout lines. This heat instantly melts away waxy soap scum, obliterates grease, and kills 99.9% of bacteria and mold on contact.
Here is how to combine them: First, apply your baking soda and hydrogen peroxide paste and let it sit for the required 15-20 minutes. This allows the chemicals to break the molecular bonds of the dirt. Then, instead of wiping it away with a cloth, hit the grout lines with the nozzle of your steam cleaner. The high-pressure steam will blast the loosened dirt, the baking soda residue, and the dead mold spores completely out of the pores of the grout in seconds. Wipe up the resulting slurry with an old towel. This method is incredibly fast and yields results that look like brand new construction. It’s the same principle of intense deep cleaning that makes maintaining household appliances essential, like knowing how to deeply clean a washing machine.
🛡️ Maintenance & Prevention Box: Keeping Your Grout Flawless
Cleaning grout is a massive chore. The best way to deal with dirty grout is to prevent it from getting dirty in the first place. Follow these critical maintenance steps:
- Seal, Seal, Seal! This is non-negotiable. Once your grout is clean and completely dry (wait at least 48 hours after cleaning), apply a high-quality penetrating grout sealer. The sealer fills the microscopic pores of the grout, creating a waterproof barrier so dirt and spills stay on the surface where they can be easily wiped away. Reapply sealer annually.
- Improve Ventilation: In bathrooms, run the exhaust fan during the shower and for 30 minutes afterward to reduce humidity and prevent mold growth.
- Use a Squeegee: After showering, spend 30 seconds squeegeeing the water off the tile walls and glass doors. Less standing water equals less soap scum and mold.
- Wipe Spills Immediately: In the kitchen, do not let coffee, wine, or oil sit on the grout. Wipe them up immediately before they can penetrate the surface.
- Ditch the Sponge Mop: Sponge mops just push dirty water into the low-lying grout lines. Use a flat microfiber mop system with clean water to wash your tile floors.
Commercial Products vs. Natural Methods: Which is Actually Better?
When standing in the cleaning aisle of a supermarket, you are faced with dozens of specialized “grout whitening” gels, foams, and acidic sprays. They promise instant results. So why go through the trouble of mixing baking soda and hydrogen peroxide?
First, there is the cost factor. A bottle of specialized grout cleaner can cost anywhere from $8 to $20. A box of baking soda and a bottle of peroxide cost less than $3 combined and can clean a vastly larger area. Second, there is the environmental and health impact. Commercial grout cleaners often contain heavy harsh acids (like hydrochloric or phosphoric acid) or strong chlorine bleach. These emit powerful fumes that require extensive ventilation, can trigger asthma, and require heavy rubber gloves and eye protection to use safely.
More importantly, highly acidic commercial cleaners actually damage your grout over time. Acid eats away at the cement binder in the grout. While it removes a microscopic top layer of the grout (taking the dirt with it and making it look very white initially), it permanently etches and degrades the grout structure. Repeated use of harsh acids will cause your grout to become brittle, crack, and eventually crumble out of the joints completely. The alkaline nature of baking soda is structurally safe for cement-based grout, cleaning it without dissolving it.
When is Grout Too Far Gone? (Knowing When to Regrout)
Even the most miraculous baking soda and hydrogen peroxide paste has its limits. Sometimes, grout is simply beyond saving, and no amount of cleaning will restore it. You should stop scrubbing and consider regrouting if you encounter the following situations:
- The Grout is Crumbling or Flaking: If large chunks of grout come out when you brush it, the structural integrity has failed (often due to age or harsh acid cleaners). Cleaning will only wash more of it away. It needs to be scraped out and replaced to protect the substrate behind the tiles from water damage.
- Deep-Rooted Mold: If you have cleaned the surface mold away, but the grout still has a dark, shadowy stain deep within, the mold has likely penetrated completely through the grout line to the backing board. This is a health hazard and a structural issue that requires professional assessment and regrouting.
- Permanent Dye Stains: If you spilled something like permanent hair dye, dark wood stain, or certain synthetic pigments on unsealed grout, it may be permanently dyed. If the peroxide does not lift it after three attempts, it is likely there to stay. Your options are regrouting or using a grout colorant/paint pen to paint over the stain.
❓ FAQ Box: Your Grout Cleaning Questions, Answered
Does cleaning grout with baking soda and vinegar work better than peroxide?
No. In fact, mixing baking soda (a base) and vinegar (an acid) just creates a fun bubbling reaction that quickly neutralizes into salty water. It loses all its cleaning power immediately. Hydrogen peroxide is vastly superior because it provides oxygenating bleaching power that actively breaks down stains without neutralizing the baking soda’s grease-cutting abilities.
How long should I leave the baking soda on grout?
You must leave the baking soda and hydrogen peroxide paste on the grout for 15 to 20 minutes. This dwell time is critical for the chemical reaction to lift the dirt out of the porous surface. Rushing this step means you will have to scrub harder.
Is it safe to use baking soda on all types of tile?
Baking soda is safe for the grout itself and safe for glazed ceramic or porcelain tiles. However, if you have natural stone tiles (like marble, travertine, or limestone), you must be very careful. While baking soda is mildly alkaline, hydrogen peroxide is slightly acidic and can etch or dull polished natural stone over time. Always spot test natural stone first.
Why did my grout turn yellow after cleaning it with baking soda?
If your grout turned yellow, it is almost certainly because you did not rinse the area thoroughly enough. The dish soap and dissolved body oils or dirt can leave a yellow-ish residue if not completely washed away with fresh warm water. Give the floor a thorough mop with plain water to resolve this.
Can I use OxiClean instead of hydrogen peroxide?
Yes! OxiClean (sodium percarbonate) is essentially a dry, powdered form of hydrogen peroxide mixed with washing soda. You can make a paste using OxiClean and warm water, and it will achieve very similar, excellent results on stained grout.
How often should I deep clean my grout?
If you seal your grout properly, you should only need to deep clean it with this baking soda method once or twice a year. High traffic areas might require a deep clean every 6 months. Regular weekly mopping with a gentle, neutral floor cleaner will handle standard maintenance.
Does this method work on epoxy grout?
Epoxy grout is naturally waterproof, stain-resistant, and non-porous. Therefore, it rarely gets deeply stained like cement grout. You can use this method on epoxy grout to remove surface grime, but it is usually overkill; a simple wipe with mild soapy water is usually enough for epoxy.
To conclude, transforming your dirty, stained, or moldy grout doesn’t have to involve harsh chemicals, toxic fumes, or hours of backbreaking manual labor. By understanding the chemistry of how baking soda and hydrogen peroxide interact, you can let the ingredients do the heavy lifting for you.
Remember the most important rule of the “no scrub” method: patience. The 15 to 20 minute wait time is the difference between effortlessly wiping away grime and furiously scrubbing with a toothbrush. Whether you are tackling a sprawling kitchen floor, a humid bathroom shower, or a delicate kitchen backsplash, this natural, inexpensive paste is your best defense against dingy grout lines.
Once you have achieved that pristine, brand-new look, do yourself a massive favor and protect your hard work. Buy a high-quality penetrating sealer and apply it meticulously to every grout line you just cleaned. That single step will ensure that the next time you drop food or track mud into the house, it wipes right off the surface, keeping your floors looking spotless for years to come.
✅ Bottom Line Box: The Final Takeaway
The most effective way to clean grout with baking soda without scrubbing is to create a thick paste using 1/2 cup baking soda, 1/4 cup 3% hydrogen peroxide, and 1 tsp dish soap. Apply it generously to the grout lines and, crucially, let it sit undisturbed for 15-20 minutes. This allows the oxygenating reaction to lift dirt and kill mold from deep within the porous surface. Wipe clean, rinse thoroughly, and always apply a penetrating sealer once dry to prevent future stains and make routine maintenance a breeze.
Thank you for reading this ultimate guide from TidyUp Daily. We believe that maintaining a beautiful, hygienic home shouldn’t require exposing your family to harsh industrial chemicals or spending your entire weekend doing exhausting chores. Armed with simple pantry staples like baking soda and hydrogen peroxide, a little bit of scientific understanding, and the right techniques, you can tackle even the most stubborn home cleaning challenges. Don’t forget to check out our other deep-dive guides for keeping every corner of your home sparkling clean, from dealing with stubborn bathroom mold to maintaining the hidden components of your household appliances. Happy cleaning!
Bonus Section: Advanced Troubleshooting for the Toughest Stains
Sometimes, you follow all the instructions perfectly, but a stubborn stain remains. When learning how to clean grout with baking soda, it is important to have a backup plan for when standard procedures fall short. Let us explore some advanced troubleshooting techniques for specific, resilient stains.
Red Wine Stains: If you drop a glass of red wine on an unsealed kitchen floor, the anthocyanin pigments can immediately sink into the grout. If the standard baking soda and peroxide paste does not work after a 20-minute dwell time, you may need to increase the concentration of the peroxide. While household peroxide is 3%, you can find 6% or even 12% (often sold at beauty supply stores as developer). Be incredibly careful with these higher concentrations; wear gloves and eye protection, and ensure absolute ventilation. Apply the stronger peroxide directly to the stained grout line, top with baking soda to keep it in place, and wait 5 minutes before wiping. Rinse excessively.
Rust Stains: If you have an old metal shaving cream can or a leaky pipe, rust can deeply stain bathroom grout. Rust is iron oxide, and alkaline cleaners like baking soda are sometimes ineffective against it. In this highly specific scenario, you may need an acidic cleaner. Lemon juice or a paste made from cream of tartar and water can be applied specifically to the rust stain. The mild acid will dissolve the iron oxide. Once the rust is gone, neutralize the area thoroughly with your baking soda paste, rinse, and seal.
Deep Oil Stains in Garages or Kitchens: Motor oil or heavy cooking grease that has sat for months will polymerize, turning into a hard, plastic-like substance inside the grout pores. The dish soap in our standard recipe might not be strong enough. For polymerized oil, you can try applying a commercial degreaser first (like a citrus-based solvent), letting it dwell to break the oil’s surface tension, rinsing it, and then following up with the baking soda and peroxide paste to pull the remaining pigment out of the pores.
The Evolution of Grout: Why Cleaning Has Changed
To truly master how to clean grout with baking soda, it helps to understand how grout itself has evolved over the decades. In older homes (built before the 1990s), grout lines were often much wider, and the grout itself was primarily composed of un-modified Portland cement and coarse sand. This old-school grout was incredibly porous and prone to cracking as houses settled. Cleaning this type of grout was a nightmare because the deep pores held onto dirt tenaciously, and harsh scrubbing would literally brush the sand away, hollowing out the joints.
Modern grout, often referred to as “polymer-modified” grout, contains latex or acrylic additives. These polymers are mixed directly into the dry cement powder. When hydrated, they form a matrix that makes the grout slightly flexible, significantly stronger, and, most importantly, much less porous and less prone to absorbing water. While polymer-modified grout is still considered a porous surface and absolutely requires sealing, it is much easier to maintain than its historic counterpart.
Furthermore, the rise of epoxy grout in residential settings has changed the game. Previously only used in commercial kitchens or industrial settings due to its difficult installation process, new formulations of epoxy grout are becoming popular for high-end residential bathrooms and floors. Epoxy grout contains no cement at all; it is a mixture of resin and a hardener. Once cured, it is completely impervious to water, virtually stain-proof, and never needs to be sealed. If you are ever renovating a bathroom and dread the thought of future cleaning, demanding epoxy grout from your contractor is the smartest investment you can make.
However, for the vast majority of us living with standard, cementitious grout, the baking soda and hydrogen peroxide method remains the undisputed champion of home maintenance. It bridges the gap between effective deep cleaning and safe, non-destructive chemical application. It honors the structural integrity of the cement while aggressively targeting the organic compounds that ruin its aesthetic appeal.
In conclusion, the journey to pristine floors and walls does not require expensive, toxic, or destructive methods. The simple, humble box of baking soda sitting in your pantry, when activated by the oxygenating power of hydrogen peroxide, represents a triumph of practical chemistry. It allows you to reclaim your weekends, protect your indoor air quality, and preserve the longevity of your tile installations. So, the next time you notice those lines turning dark and dingy, skip the bleach aisle, mix up this simple paste, and let science do the scrubbing for you.