- Quick Answer: How to Clean Yellow Headlights with Toothpaste
- Why Do Headlights Turn Yellow and Foggy?
- The Science: Why Toothpaste and Baking Soda Work
- Step 1: Prep and Pre-Clean (The Vinegar Method)
- Step 2: The COMBO Method (Toothpaste + Baking Soda)
- Step 3: The Crucial Final Step – UV Clear Coat Sealant
- Alternative Methods: The WD-40 Hack vs. Wet Sanding
- Cost Comparison: DIY vs. Professional vs. Replacement
- ❓ Frequently Asked Questions
- Author
Quick Answer: How to Clean Yellow Headlights with Toothpaste
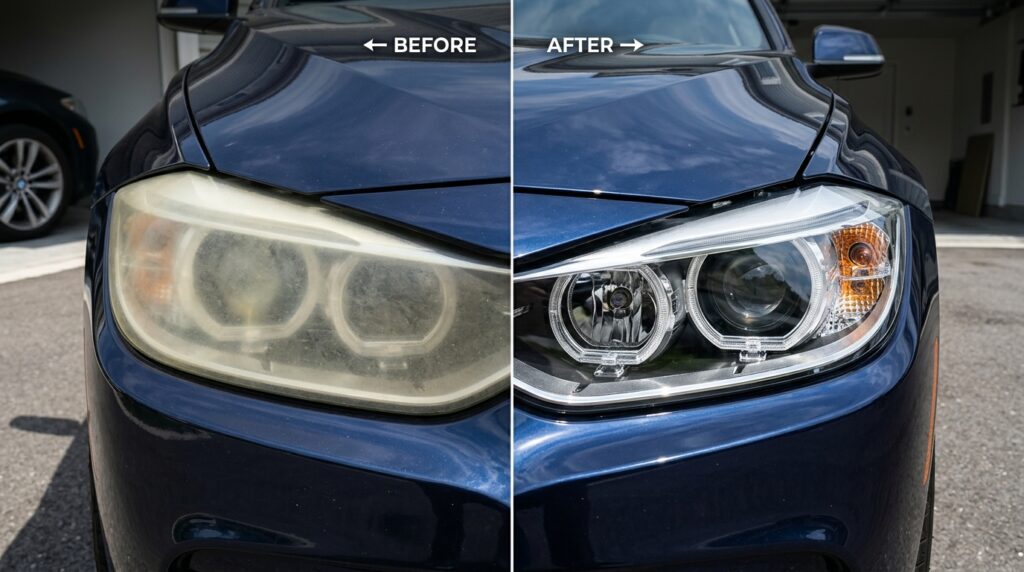
To restore headlights with baking soda and toothpaste, mix 2 tablespoons of whitening toothpaste with 1 tablespoon of baking soda to create a thick, abrasive paste. Apply this mixture directly to your cloudy, yellowed headlights using a microfiber cloth. Rub in straight, horizontal lines (not circular motions) for 3 to 5 minutes per headlight. The mild abrasives in the toothpaste combined with the grit of baking soda will gently sand away the top layer of UV-oxidized polycarbonate plastic. Rinse with water, dry thoroughly, and apply a UV clear coat sealant to prevent them from turning yellow again.
Are your car headlights looking cloudy, foggy, or severely yellowed? You are not alone. It’s a common problem that not only makes your vehicle look older than it is, but also poses a serious safety hazard by reducing your night visibility. When searching for how to unyellow headlights, you’ll find hundreds of products and professional services claiming to offer the perfect solution. But before you spend $75 to $150 on professional restoration, or $200 to $400 on complete headlight replacement, there is a DIY method that costs under $5. You can restore headlights with baking soda and toothpaste, two items you likely already have in your bathroom and kitchen.
This guide is the ultimate deep dive into the science, the exact methodology, and the crucial finishing steps that most online tutorials skip. We’ll explore why headlights turn yellow, the chemical reactions involved, and how a simple combination of toothpaste and baking soda can strip away years of oxidation. We will also cover the vinegar pre-cleaner method, the WD-40 hack, and the crucial UV sealant application. Let’s get those headlights crystal clear again!
Why Do Headlights Turn Yellow and Foggy?
Before we dive into how to clean yellow headlights with toothpaste, it is essential to understand why this happens in the first place. Modern car headlights are not made of glass; they are manufactured from polycarbonate plastic. Polycarbonate is an incredibly strong, impact-resistant material that is perfect for withstanding small rocks and road debris without shattering. However, it has one major weakness: ultraviolet (UV) radiation from the sun.
When your car rolls off the factory floor, the polycarbonate headlights are coated with a protective UV-resistant clear coat. Over time—usually after 3 to 5 years of exposure to direct sunlight, harsh weather, road salt, and harsh cleaning chemicals—this factory UV coating begins to degrade and peel away. Once the bare polycarbonate plastic is exposed to the sun’s UV rays, a process called oxidation occurs.
Oxidation breaks down the molecular structure of the plastic at the surface level, causing it to develop a hazy, cloudy, and yellowish appearance. In addition to UV damage, headlights are constantly bombarded by road grime, acid rain, and exhaust fumes, which form a hard, baked-on layer over the oxidized plastic. This is why standard soap and water will not work. You need a mild abrasive to physically remove the damaged, yellowed layer of plastic, revealing the fresh, clear polycarbonate underneath. This is exactly where our toothpaste and baking soda method comes into play.
🧹 What You Need
- Whitening Toothpaste: 4 tablespoons (Must be a traditional opaque white paste, NOT a gel. Brands with baking soda or peroxide included work best.)
- Baking Soda: 2 tablespoons (Adds extra granular abrasive power)
- Warm Water: 1 cup (For mixing and rinsing)
- White Vinegar: 1/2 cup (Optional, for pre-cleaning road grime)
- Microfiber Cloths: 3 to 4 clean, dry cloths (Do not use paper towels as they can scratch the plastic)
- Painter’s Tape: 1 roll (Automotive grade, to protect the paint around the headlights)
- UV Clear Coat Sealant: 1 can or bottle (Crucial for preventing future yellowing. Alternatively, a high-quality car wax)
- Soft Bristle Toothbrush: 1 (For scrubbing edges and corners)
The Science: Why Toothpaste and Baking Soda Work
You might be wondering, why toothpaste? Toothpaste is designed to remove plaque and surface stains from the hard enamel of your teeth. To do this, it contains mild abrasives, typically hydrated silica, calcium carbonate, or dicalcium phosphate. These abrasives are hard enough to scrub away stains but gentle enough not to scratch tooth enamel.
Coincidentally, the hardness of these abrasives is perfect for polishing polycarbonate plastic. When you rub toothpaste on an oxidized headlight, the tiny abrasive particles act like micro-sandpaper. They gently grind away the degraded, yellowed layer of plastic without causing deep scratches that would ruin the lens. Whitening toothpastes are especially effective because they contain a higher concentration of abrasives and often incorporate mild chemical bleaching agents like hydrogen peroxide.
However, sometimes toothpaste alone isn’t gritty enough for severely yellowed headlights. This is why we add baking soda (sodium bicarbonate). Baking soda is a crystalline compound that acts as a fantastic, mild abrasive. When mixed with the toothpaste, it provides extra “bite” to cut through thick oxidation. Additionally, baking soda has a mildly alkaline pH, which helps to neutralize acidic road grime and bug splatter that may be baked onto the headlight. For more on the power of baking soda, check out our guide on how to clean a burnt greasy oven tray with baking soda paste, which uses a similar principle.
Step 1: Prep and Pre-Clean (The Vinegar Method)
Preparation is key to a successful DIY headlight restoration. First, park your car in a shaded area. Working on hot headlights in direct sunlight will cause your paste to dry out too quickly, reducing its effectiveness and making it difficult to remove. Make sure the headlights are cool to the touch.
Next, apply automotive painter’s tape carefully around the perimeter of the headlights. This protects your car’s paint from the abrasive action of the toothpaste and baking soda. If you accidentally scrub your clear coat with this mixture, you will leave dull, scratched spots on your paint.
Before applying the abrasive paste, you need to remove surface dirt, bugs, and oily road grime. Mix 1/2 cup of white vinegar with 1/2 cup of warm water in a spray bottle. Spray the headlights generously and wipe them down with a microfiber cloth. The acetic acid in the vinegar cuts through organic matter and grease, ensuring that your toothpaste and baking soda mixture can focus purely on the oxidized plastic rather than surface dirt. If you have severe grease build-up, you might also find our all-purpose citrus degreaser spray recipe useful.
Step 2: The COMBO Method (Toothpaste + Baking Soda)
Now for the main event: restoring the headlights. While you can use just toothpaste or just a baking soda paste, the COMBO method is widely regarded as the most effective DIY approach for heavily oxidized headlights.
In a small bowl, combine 2 tablespoons of whitening toothpaste with 1 tablespoon of baking soda. Add a few drops of water—just enough to mix it into a thick, gritty paste. You want the consistency to resemble thick frosting; if it is too runny, it will drip off the headlight.
Take a clean microfiber cloth or a soft sponge, scoop up a generous dollop of the paste, and apply it directly to the headlight lens. Begin scrubbing the lens using firm pressure. Here is a critical technique tip: Rub in straight, horizontal lines. Do not use circular motions. Circular motions can create swirl marks in the plastic that scatter the light beam, reducing visibility. Horizontal scrubbing mimics the natural beam pattern and is safer for the lens surface.
Spend about 3 to 5 minutes scrubbing each headlight. You should start to see the white paste turning yellowish or brownish. This is a great sign! It means the abrasive action is successfully stripping away the oxidized layer of plastic and the ingrained dirt. For tight corners or edges near the tape line, use the soft bristle toothbrush to ensure you reach every inch of the lens.
Once you have thoroughly scrubbed the entire surface, use clean, warm water and a fresh microfiber cloth to rinse the paste away completely. Dry the headlight perfectly with another dry microfiber towel. Step back and admire the difference. The yellow, cloudy haze should be gone, leaving behind clear plastic. If they are still slightly cloudy, you can repeat the process a second time.
⚠️ What Not to Do
- DO NOT use gel toothpaste: Gel toothpastes lack the necessary abrasive particles (like silica) required to sand away the oxidation. You must use a traditional, opaque white paste.
- DO NOT use circular motions: Scrubbing in circles can create micro-scratches and swirl marks that distort the light beam. Always use straight, horizontal strokes.
- DO NOT skip the painter’s tape: The abrasives in toothpaste and baking soda will scratch and dull your car’s clear coat paint if you accidentally scrub beyond the headlight.
- DO NOT use harsh chemicals like acetone or bleach: These will permanently melt, crack, or cloud the polycarbonate plastic, ruining the headlight completely.
Step 3: The Crucial Final Step – UV Clear Coat Sealant
Here is the biggest secret in the automotive detailing world, and the step that 90% of online DIY guides completely ignore. Once you have used the toothpaste and baking soda to scrub away the yellow oxidation, your headlights look amazing, right? But what you have also done is strip away any remaining factory UV protection. The bare polycarbonate plastic is now entirely exposed to the elements.
If you stop right now, your headlights will turn yellow again in a matter of weeks, sometimes even days, because the sun’s UV rays will immediately begin oxidizing the raw plastic. To make your hard work last, you absolutely must apply a protective layer.
The best option is a dedicated automotive UV clear coat sealant spray. Ensure the headlight is 100% clean and bone dry. Following the instructions on the sealant can, spray a light, even coat over the headlight. Allow it to flash (dry slightly), and then apply a second, heavier coat. This clear coat creates a hard, UV-resistant shell over the polycarbonate, effectively replacing the factory coating. A proper clear coat application can keep your headlights clear for 1 to 3 years.
If you are on a strict budget and don’t want to buy a clear coat spray, car wax or synthetic paint sealant is an acceptable alternative. Apply a thick layer of car wax, let it dry to a haze, and buff it off. While wax provides good UV protection and water beading, it is not as durable as a clear coat spray. You will need to reapply the wax every 2 to 3 months to maintain the protection. (Speaking of stubborn stains and maintenance, you might be interested in our guide on how to remove oil stains from a concrete driveway).
Alternative Methods: The WD-40 Hack vs. Wet Sanding
You may have seen viral videos showing people spraying WD-40 on yellow headlights and wiping them clean instantly. Does it work? Yes, but it is a temporary illusion. WD-40 is a penetrating oil. When you spray it on oxidized plastic, the oil seeps into the micro-cracks and pores of the oxidation, temporarily making it transparent. However, as soon as it rains, or you wash your car, or the oil simply evaporates after a few days, the yellow cloudy look will return. WD-40 does not remove the oxidation; it only hides it. It is not a permanent solution for how to unyellow headlights.
On the other end of the spectrum is the wet sanding method. If your headlights are so severely oxidized that they are rough to the touch and completely opaque, the toothpaste method might not be aggressive enough. In these extreme cases, you need to use automotive sandpaper. You begin with a coarse grit, like 400 or 600 grit, sanding the headlight with water to remove the thick crust of oxidation. You then progress to finer grits—800, 1000, 1500, 2000, and finally 3000 grit—to smooth out the scratches left by the previous paper. Finally, you polish the lens with a buffing compound. This is exactly what professional restoration services do. It is highly effective but requires more time, money, and skill than the toothpaste and baking soda method.
🛡️ Maintenance & Prevention
Keeping your headlights clear is all about ongoing UV protection and regular maintenance. Here is how to prevent them from turning yellow again:
- Park in the Shade: UV rays are the primary enemy. Whenever possible, park in a garage, under a carport, or in the shade to minimize direct sun exposure on the headlights.
- Regular Waxing: Every time you wash and wax your car’s paint, apply a coat of wax or synthetic sealant to the headlights as well. This provides a sacrificial layer of UV protection.
- Wash Frequently: Road grime, salt, and bug splatter can degrade the plastic if left sitting for too long. Wash your headlights weekly with automotive soap.
- Consider Paint Protection Film (PPF): For the ultimate long-term protection, you can apply a clear, UV-resistant vinyl film (PPF) over the restored headlights. This physical barrier offers the best defense against oxidation and rock chips.
Cost Comparison: DIY vs. Professional vs. Replacement
Why should you bother learning how to clean yellow headlights with toothpaste? The answer is simple economics. Let’s look at the cost breakdown:
DIY Toothpaste & Baking Soda: Under $5. You likely already have these items at home. Even if you have to buy a tube of whitening toothpaste and a box of baking soda, your total investment is minimal. Adding a $10 can of clear coat spray brings the total to $15 for a near-professional result.
Professional Headlight Restoration: $75 to $150. Many auto detailing shops and mechanics offer headlight restoration services. They typically use the wet sanding and machine polishing method, followed by a professional-grade UV sealant. While the results are excellent, it is a significant expense for something you can largely replicate at home.
Complete Headlight Replacement: $200 to $400+ per pair. If your headlights are cracked, letting in moisture, or the reflective material inside the housing is peeling, restoration will not fix them. You will need to buy new headlight assemblies. This is the most expensive route and usually unnecessary if the problem is only exterior surface oxidation.
Beyond the cost, there is the critical aspect of safety. Yellow, foggy headlights scatter the light from your bulbs, drastically reducing the distance you can see down the road at night. This gives you less time to react to pedestrians, animals, or debris. In many regions, severely oxidized headlights will cause your vehicle to fail its annual MOT or safety inspection. Restoring your headlights isn’t just about making your car look good; it is about keeping you safe.
❓ Frequently Asked Questions
Does any toothpaste work for cleaning headlights?
No, gel toothpastes are ineffective because they lack the necessary abrasive particles. You must use a traditional, opaque white paste. Whitening toothpastes or those containing baking soda are the best options because they have a higher concentration of abrasives to sand away the oxidation.
How long does the toothpaste and baking soda method last?
If you only clean the headlights and do not apply a sealant, they will likely turn yellow again within a few weeks to a couple of months. If you apply a high-quality UV clear coat sealant spray after cleaning, the results can last anywhere from 1 to 3 years.
Can baking soda scratch my headlights?
Baking soda is a mild abrasive. When mixed with toothpaste or water to form a paste, it is gritty enough to remove the oxidized layer of plastic but generally not hard enough to create deep, damaging scratches in the underlying polycarbonate, provided you rub gently in straight lines.
Is it better to use WD-40 or toothpaste on headlights?
Toothpaste is much better. WD-40 only temporarily hides the oxidation by filling in the micro-cracks with oil. The cloudy appearance will return as soon as the oil washes away. Toothpaste physically removes the damaged layer of plastic, providing a genuine, long-lasting restoration.
When should I just replace my headlights instead of restoring them?
You should replace the headlight assembly if the plastic is physically cracked, if there is condensation or water pooled inside the lens, or if the silver reflective coating on the inside of the housing is peeling or flaking off. Exterior restoration cannot fix internal damage.
Will this method work on glass headlights?
Glass headlights (usually found on older classic cars) do not turn yellow or oxidize from UV exposure like modern polycarbonate plastic lenses do. If glass headlights are cloudy, it is usually due to dirt on the inside or moisture, which requires cleaning the inside of the lens or replacing the seal.
✅ Bottom Line
Learning how to restore headlights with baking soda and toothpaste is one of the most effective, budget-friendly DIY car maintenance tricks available. By understanding that you are physically sanding away a layer of UV-damaged plastic, you can see why the gritty combination of whitening paste and baking soda works so well. Just remember the golden rule: the cleaning process is only half the job. To keep those headlights crystal clear and ensure your safety on the road at night, you must apply a UV clear coat sealant to protect the fresh plastic from the sun.