Quick Answer
Burnt oven grease is polymerized fat — oil that has bonded to metal through heat. Break it down with a thick baking soda paste left overnight, followed by a vinegar spray to fizz away residue. The alkaline pH of baking soda (8.3) saponifies the grease, turning it into a water-soluble soap without toxic fumes.
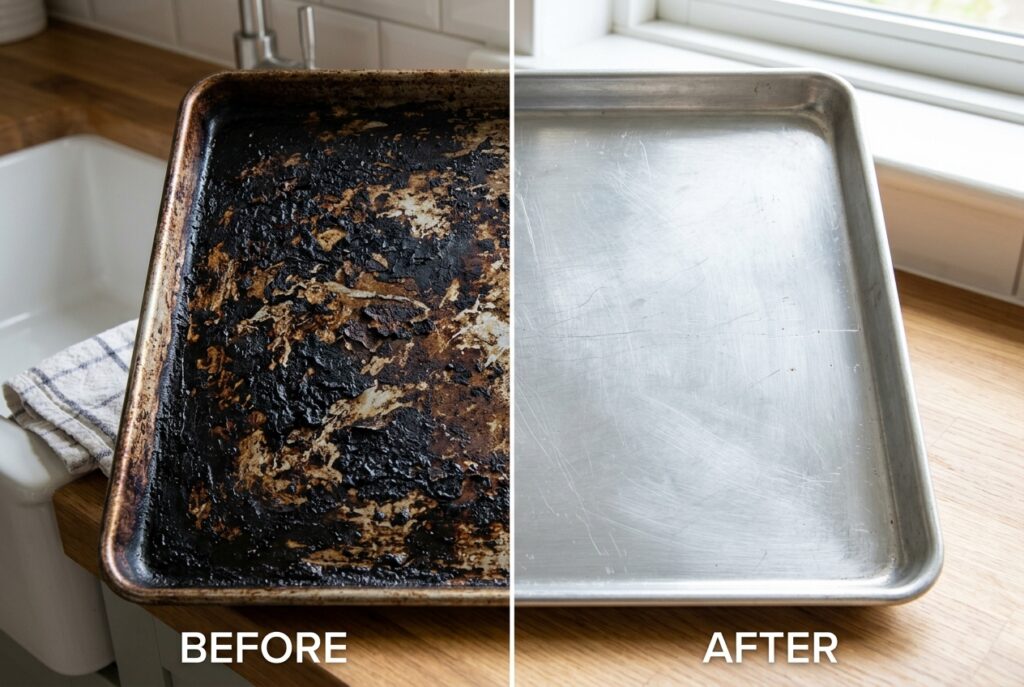
That dark, crusty layer on your oven tray is not just burnt food — it is carbonized polymerized oil. When cooking fats are heated past their smoke point repeatedly, they undergo a chemical transformation called polymerization. The fat molecules cross-link and bond to the metal surface, creating a hard, plastic-like coating that resists normal washing. Many people struggle with this issue, spending hours scrubbing with ineffective tools and harsh chemicals, only to find that the stubborn stains remain firmly attached to their baking trays.
This is the exact same chemistry that makes cast iron seasoning work — except on a baking tray, you do not want it. The solution is reversing the process with alkaline chemistry. By understanding the underlying chemical reactions, you can save yourself a immense amount of physical labor and frustration. For more on cast iron, see our guide on cast iron restoration. This knowledge transforms a grueling chore into a simple, hands-off process where science does the heavy lifting for you.
The truth is, many home cooks toss their dirty baking trays in the trash because they believe the burnt-on grime is permanent. But with the right approach, even the most neglected, blackened oven trays can be brought back to a gleaming, like-new condition. The key is patience and utilizing the natural cleaning power of common household ingredients like baking soda, rather than relying on abrasive scouring pads that will permanently scar the metal.
- Commercial vs Natural Cleaners: Why Baking Soda Wins
- Different Methods for Different Tray Materials
- 🧹 What You Need
- Step 1: Make a Thick Baking Soda Paste
- Step 2: Apply and Wait Overnight
- The Overnight Soak Method for Extreme Buildup
- Step 3: Vinegar Spray and Scrub
- ⚠️ What Not to Do
- 🛡️ Maintenance & Prevention Tips
- The Environmental Impact of Natural Cleaning
- ❓ FAQ
- ✅ Bottom Line
- 📖 Related Cleaning Guides
- Author
Commercial vs Natural Cleaners: Why Baking Soda Wins
Walk down the cleaning aisle of any supermarket, and you will see dozens of commercial degreasers and oven cleaners promising instant results. While these products can be effective, they often rely on extremely harsh, caustic chemicals like sodium hydroxide (lye) or strong petroleum solvents. These ingredients can produce toxic fumes that irritate the eyes, skin, and respiratory system. Using them in a poorly ventilated kitchen can be outright dangerous, especially for households with children or pets.
Furthermore, harsh commercial cleaners can actually damage your bakeware over time. Strong caustics can pit aluminum, strip away non-stick coatings, and leave a hazy residue on stainless steel. In contrast, baking soda is a naturally occurring mineral compound (sodium bicarbonate) that is completely non-toxic and food-safe. It is gentle enough to use on almost any surface, yet chemically active enough to break down the most stubborn polymerized fats.
Baking soda wins because it utilizes the power of saponification without introducing dangerous toxins into your food preparation areas. It is also incredibly cost-effective. A massive box of baking soda costs just a few dollars, whereas specialized oven cleaners can be quite expensive. By choosing baking soda, you are making a safer, more economical, and more environmentally friendly choice for your home.
If you prefer a spray format for lighter jobs, consider making our all-purpose citrus degreaser spray recipe, which complements the heavy-duty baking soda paste perfectly. Combining these natural methods ensures your kitchen remains sparkling clean and free of harsh chemical odors.
Different Methods for Different Tray Materials
Not all baking trays are created equal, and the cleaning method you choose must be tailored to the specific material of your pan. Using the wrong approach can result in permanent scratches, rust, or the complete destruction of a non-stick coating. Let’s break down how to handle the most common types of bakeware safely and effectively.
Aluminum Trays: Aluminum is an excellent heat conductor, making it a favorite for baking sheets. However, it is a relatively soft metal that is prone to scratching and pitting. Never use steel wool, stiff wire brushes, or harsh caustic oven cleaners on bare aluminum. The baking soda paste method is ideal here, but you must use a non-scratch nylon scrubber or a soft sponge. If the baking soda leaves a slight dark oxidation mark on the aluminum (which can happen with prolonged contact), a quick wash with acidic white vinegar or lemon juice will restore the shine.
Stainless Steel Trays: Stainless steel is much more resilient than aluminum. It can handle more vigorous scrubbing and is highly resistant to corrosion. While the baking soda paste is still the best primary method, you can use slightly more abrasive scrubbers, like a copper scrubbing pad, on stubborn spots without worrying as much about deep scratches. However, avoid using steel wool, as tiny particles of plain steel can embed in the stainless surface and cause rust spots over time.
Non-Stick and Ceramic Trays: These require the utmost care. The baking soda paste method is safe, but you must be incredibly gentle during the scrubbing phase. Use only a soft microfiber cloth, a silicone scraper, or a sponge specifically rated for non-stick surfaces. Never use any abrasive pads, as scratching the non-stick coating will ruin the pan and potentially release harmful compounds into your food.
Glass and Pyrex Bakeware: Glass is impervious to most chemicals but can be scratched by hard abrasives. The baking soda method works wonderfully on baked-on grease on glass dishes. For extreme buildup, check out our guide on cleaning oven door glass, as the principles are exactly the same. The combination of alkaline paste and time will lift the grease right off the smooth glass surface.
🧹 What You Need
- 🔹 Baking soda (sodium bicarbonate — ½ cup minimum, pH 8.3, mild alkali)
- 🔹 White vinegar in a spray bottle (5% acidity for maximum fizzing action)
- 🔹 Hydrogen peroxide (3% — optional for heavy buildup, helps oxygenate and lift stains)
- 🔹 Dish soap (Dawn or similar grease-cutting liquid, 1 tablespoon)
- 🔹 Non-scratch scrub sponge (nylon or silicone based)
- 🔹 Plastic scraper (for thick carbon deposits, never use metal spatulas)
Step 1: Make a Thick Baking Soda Paste
The foundation of this cleaning method is creating the perfect baking soda paste. Begin by measuring out at least ½ cup of baking soda into a small mixing bowl. Depending on the size of your oven tray and the severity of the grease buildup, you may need to double or even triple this recipe. The goal is to have enough paste to generously coat the entire affected area with a thick, opaque layer. Do not skimp on the baking soda, as it is the primary active ingredient that will do the heavy lifting.
Slowly add warm water, mixing continuously, until you achieve a consistency similar to thick frosting or toothpaste. It should be wet enough to spread easily but thick enough that it won’t run off the sides of the pan. For an extra boost of grease-cutting power, incorporate 1 tablespoon of high-quality dish soap (like Dawn) into the mixture. The surfactants in the dish soap will help penetrate the top layer of grease, allowing the baking soda to access the deeper, polymerized layers.
If you are dealing with particularly stubborn stains or older, deeply set carbonization, substitute the warm water with hydrogen peroxide (3%). The addition of hydrogen peroxide introduces an oxygenating bleaching action that further breaks down organic matter. This combination is incredibly potent and is detailed further in our article on how to clean a greasy baking tray with baking soda and peroxide. Whichever liquid you choose, ensure the final paste is thoroughly mixed and free of dry clumps.
💡 The Science: Baking soda is a mild alkali (pH 8.3). When it contacts grease (a fatty acid), it triggers saponification — the same chemical reaction used to make soap. The alkali breaks the ester bonds in fat molecules, converting them into glycerol and fatty acid salts (soap), which dissolve in water. This is why alkaline cleaners are vastly superior to acidic cleaners for degreasing.
Step 2: Apply and Wait Overnight
Once your paste is perfectly mixed, it is time to apply it to the offending oven tray. Using a spatula, a soft brush, or simply your gloved hands, spread the paste in a thick, even layer over all the greasy, burnt areas. Pay special attention to the corners, crevices, and rolled edges of the tray, as these are the areas where grease tends to accumulate most heavily and bake on the hardest. The paste needs physical contact with the grease to work, so ensure full coverage.
After applying the paste, you must prevent it from drying out. If the baking soda dries into a hard crust, the chemical reaction will stop, and it will be incredibly difficult to remove. To keep the paste moist and active, cover the entire tray tightly with plastic wrap. The plastic wrap acts as a vapor barrier, trapping the moisture and allowing the alkaline mixture to continuously work on breaking down the polymerized fat over an extended period.
Now comes the most difficult part: waiting. Let the covered tray sit for 8 to 12 hours, or ideally, overnight. The extended dwell time is absolutely critical for success. Saponification is a slow chemical reaction at room temperature. Rushing this step is the number one reason people mistakenly believe that baking soda does not work for heavy grease. You must give the chemistry enough time to fully break the molecular bonds of the baked-on oil.
If you are tackling a massive project, like an entire flat top, you can adapt this method. See our guide on how to clean a greasy flat top griddle for large-scale applications of this same fundamental chemistry.
The Overnight Soak Method for Extreme Buildup
For oven trays that have been neglected for years and have accumulated a thick, seemingly impenetrable layer of black carbon, the standard paste application might require a slight modification. In these extreme cases, we recommend the full submersion “Overnight Soak Method.” This technique ensures that every microscopic pore of the baked-on grease is saturated with the cleaning solution.
To execute this, you will need a container large enough to hold the entire baking tray. A deep sink, a large plastic storage bin, or even a bathtub (lined with an old towel to prevent scratching) works well. First, coat the tray heavily in dry baking soda, rather than a pre-mixed paste. Ensure a very thick layer covers all the burnt areas. Next, boil several kettles of water. Carefully pour the boiling water into the tub, just enough to submerge the tray completely. Add a generous squirt of heavy-duty dish soap.
The heat from the boiling water accelerates the saponification reaction significantly. As the water slowly cools overnight, the baking soda and dish soap will work in tandem to deeply penetrate and soften the carbonized layer. By the next morning, the previously rock-hard buildup will have transformed into a soft, mushy residue that can often be wiped away with minimal effort. This method is incredibly effective for rescuing trays that seem completely ruined.
Step 3: Vinegar Spray and Scrub
In the morning, remove the plastic wrap from the tray. You should notice that the paste has turned a brownish-yellow color, indicating that it has successfully absorbed the broken-down grease. Now, take your spray bottle filled with white vinegar and spray it generously over the entire surface of the baking soda paste. You will immediately see and hear a vigorous fizzing reaction as the acidic vinegar reacts with the alkaline baking soda, releasing carbon dioxide gas.
This fizzing action is not just for show; the physical agitation of the bubbles helps to mechanically lift and dislodge the loosened grease particles from the microscopic pores of the metal surface. Allow the fizzing to continue for about 5 minutes. Once the reaction has subsided, take your non-scratch scrub sponge and begin working the mixture around the pan. The softened grime should come away easily, with the baking soda acting as a gentle abrasive.
For any remaining thick patches of carbon, do not reach for a metal tool. Instead, use a plastic scraper (like a pot scraper or an old credit card) to gently push the sludge off the tray. Rinse the tray thoroughly with the hottest water you can safely handle. If there are still a few stubborn spots left, it is always better to repeat the entire paste process for another few hours rather than resorting to aggressive, damaging scrubbing.
⚠️ What Not to Do
- Do not use steel wool on non-stick or aluminum trays — it will scratch and damage the surface permanently, leading to rust and food sticking.
- Do not use chemical oven cleaner sprays in an unventilated kitchen — the fumes (usually containing sodium hydroxide or lye) are highly caustic and dangerous to inhale.
- Do not skip the overnight soak — 10 minutes of paste contact time is simply not enough for the chemistry to break down heavily polymerized grease.
- Do not mix baking soda with bleach — this is unnecessary and can produce highly irritating fumes and potentially dangerous reactions.
- Do not use metal spatulas or knives to chip away at the burnt carbon, as this will gouge the metal of the baking tray.
🛡️ Maintenance & Prevention Tips
The best way to clean a burnt oven tray is to prevent the heavy buildup in the first place. Follow these simple maintenance tips to keep your bakeware looking pristine for years to come:
- Line your trays: Always use parchment paper, aluminum foil, or a reusable silicone baking mat (like a Silpat) when roasting or baking. This provides a physical barrier between the food/oil and the metal pan.
- Wash immediately: Don’t let dirty pans sit overnight. While the pan is still slightly warm (but safe to touch), soak it in hot, soapy water to prevent oils from solidifying and polymerizing.
- Routine deep clean: Perform a mini version of the baking soda paste method (leaving it for just 30-60 minutes) once a month to tackle minor grease spots before they turn into stubborn carbon deposits.
- Avoid cooking sprays on non-stick: Aerosol cooking sprays contain propellants and emulsifiers (like soy lecithin) that bake onto the surface of non-stick and aluminum pans much harder than regular cooking oils. Use a paper towel to rub a tiny amount of liquid oil on the pan instead.
The Environmental Impact of Natural Cleaning
Beyond just the safety and efficacy of the baking soda method, it is crucial to consider the environmental impact of our household cleaning choices. Every time we wash a harsh chemical degreaser down the sink, it enters our municipal water systems and, eventually, our natural waterways. Compounds found in commercial oven cleaners can be harmful to aquatic life and disrupt delicate ecosystems. By opting for natural, biodegradable ingredients like sodium bicarbonate and acetic acid (vinegar), you are making a conscious decision to protect the environment. Baking soda is mined from the earth (often in the form of trona ore) and requires minimal processing, resulting in a much lower carbon footprint compared to synthesizing complex petrochemical solvents.
Furthermore, the packaging of natural cleaners is often much more sustainable. A single cardboard box of baking soda can replace several plastic spray bottles of specialized cleaners, significantly reducing single-use plastic waste in your household. When you embrace these traditional, science-backed cleaning methods, you are not just getting cleaner baking trays; you are participating in a broader movement towards sustainable, eco-friendly living. The satisfaction of a gleaming oven tray is only magnified by the knowledge that it was achieved without compromising environmental integrity.
As we continue to learn more about indoor air quality and environmental toxins, the shift back to simple, proven chemical reactions like saponification becomes more than just a trend—it’s a necessary evolution in how we care for our homes. The baking soda paste method is a perfect example of how working with nature’s basic chemistry, rather than fighting against it with artificial compounds, yields the most impressive and lasting results for both our kitchens and our planet.
❓ FAQ
Why does baking soda work better than soap alone?
Standard liquid dish soap is formulated specifically to handle fresh, liquid grease by emulsifying it in water. However, polymerized (baked-on) grease has undergone a complex chemical change — it is no longer a simple, slippery fat. Baking soda’s highly alkaline pH (8.3) attacks these altered molecular bonds directly through a process called saponification, which normal soap cannot achieve on hard carbon deposits.
Can I use this on a non-stick tray?
Yes, absolutely. The baking soda paste method is generally gentle enough for delicate non-stick (Teflon or ceramic) coatings, provided you are careful. The crucial detail is to avoid using any abrasive scrubbers. Use only a soft microfiber cloth or a silicone spatula to gently wipe away the paste after the overnight soak.
What about using the self-clean oven cycle for my trays?
You should never leave baking trays inside the oven during a self-clean cycle. Self-clean cycles heat the interior to over 900°F to incinerate grease into ash. This extreme heat will almost certainly warp your baking trays permanently, discolor the metal, and completely destroy any non-stick coatings. It can also produce dangerous smoke and fumes in your kitchen.
How long does the baking soda paste need to sit?
For the best results on heavily burnt trays, the paste should sit for a minimum of 8 to 12 hours, which is why we recommend the overnight method. If the grease buildup is relatively light and recent, you might see success with a shorter dwell time of 2 to 4 hours. However, saponification takes time, so longer is always better.
Can I use baking powder instead of baking soda?
No, you should not substitute baking powder for baking soda in this cleaning method. Baking powder contains baking soda, but it also contains acidic compounds (like cream of tartar) and starches. The presence of the acid neutralizes the alkalinity needed for the degreasing saponification reaction. You must use pure, 100% sodium bicarbonate (baking soda) for effective cleaning.
What if the tray is still stained after the first treatment?
If decades of baked-on grease remain after the first overnight treatment, do not reach for the steel wool. Simply rinse the tray, dry it, and apply a fresh batch of baking soda paste for another overnight soak. Repeating the gentle chemical process is vastly preferable to using harsh abrasives that will scratch and permanently ruin the finish of your bakeware.
Is it safe to use hydrogen peroxide on food surfaces?
Yes, standard 3% household hydrogen peroxide is safe to use for cleaning bakeware. It breaks down rapidly into just water and oxygen when exposed to air and light, leaving no toxic residue behind. Just be sure to thoroughly wash the tray with normal dish soap and hot water after completing the cleaning process before using it for food preparation again.
✅ Bottom Line
Restoring a heavily burnt and greasy oven tray doesn’t require harsh, toxic chemicals or back-breaking scrubbing that damages the metal. Burnt oven grease is simply polymerized fat that requires alkaline chemistry to break down. By utilizing a thick baking soda paste left overnight, you trigger saponification — literally turning the stubbornly bonded grease into water-soluble soap. Follow up with a vinegar fizz to dislodge the particles and a gentle scrub. Patience is the active, essential ingredient here — let the natural chemistry do the heavy lifting for you.
📖 Related Cleaning Guides
- How to Remove Oil Stains from a Concrete Driveway with Baking Soda, Dawn & Vinegar
- How to Clean a Greasy Flat Top Griddle with Baking Soda, Dawn & Vinegar
- All-Purpose Citrus Degreaser Spray Recipe
- How to Clean a Greasy Baking Tray with Baking Soda and Peroxide
- How to Restore Cast Iron
- How to Clean Oven Door Glass
Related Cleaning Guides:
- How to Clean Greasy Baking Trays
- Homemade DIY Degreaser Spray Recipe
- How to Clean a Greasy Flat Top Griddle
- How to Clean a Greasy BBQ Grill Top & Grates