Quick Answer
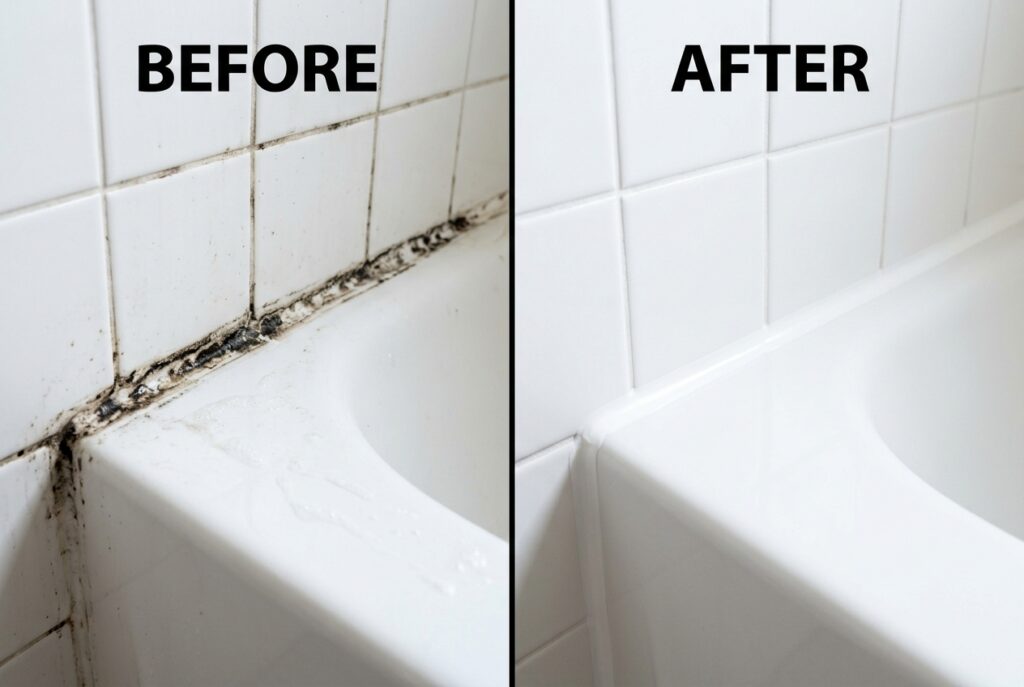
Black mold on bathtub caulk lines is almost impossible to remove with regular spray cleaners because the mold roots grow inside the porous silicone. You need a thick gel formula that clings to the caulk line for hours — killing mold below the surface instead of just bleaching the top. A baking soda and peroxide paste works for mild cases, but for deep-set caulk mold, a professional-grade mold removal gel is the fastest and most permanent solution.
You have probably tried everything. Bleach spray. Vinegar. Scrubbing until your knuckles ache. And every single time, the black mold on your bathtub caulk line comes crawling back within a week or two. It is not your fault — it is the wrong approach entirely.
Here is what nobody tells you: spray cleaners do not work on caulk mold. When you spray bleach on a vertical caulk line, it runs off in seconds. The bleach contacts the surface for maybe 10 to 15 seconds — nowhere near long enough to penetrate the silicone where the mold roots live. You are essentially giving the mold a rinse and watching it grow back stronger.
💡 The Science: Bathtub caulk is made of silicone — a porous polymer full of microscopic gaps. Mold hyphae (root-like filaments) grow into these gaps, sometimes penetrating 2 to 3mm below the surface. Standard liquid cleaners cannot reach that depth because gravity pulls them away from vertical surfaces within seconds. This is why gel formulations are critical — they cling to the caulk line for hours, maintaining contact time long enough for the active ingredients to penetrate and destroy the embedded hyphae.
- Understanding Black Mold: Is It Dangerous?
- Why Bathtub Caulk Gets Mold (And Why It Keeps Coming Back)
- Hydrogen Peroxide vs Bleach: Which Is Better for Mold?
- When to Remove and Replace Caulk vs Clean It
- 🧹 What You Need
- Step 1: Make a Thick Peroxide-Baking Soda Paste
- Step 2: Apply to the Caulk Line and Seal with Plastic Wrap
- Step 3: Wait 2 to 4 Hours (Or Overnight)
- Step 4: Remove, Scrub, and Rinse
- Preventing Mold from Coming Back: Ventilation & Humidity Control
- ⚠️ What Not to Do
- ❓ FAQ
- ✅ Bottom Line
- 📖 Related Cleaning Guides
- Author
Understanding Black Mold: Is It Dangerous?
When homeowners spot black spots lining their bathtub, panic is often the first reaction. The phrase “black mold” brings to mind toxic spores, severe respiratory distress, and expensive professional remediation. However, the black mold growing on your shower caulk is usually not the highly dangerous Stachybotrys chartarum, which requires a constant source of cellulose (like drywall or wood) to thrive.
Instead, the mold found in bathrooms is most commonly Cladosporium or Aspergillus. While these are less toxic, they are still highly allergenic. When left untreated, they continuously release spores into the confined space of your bathroom. Every time you turn on a hot shower, the steam carries these spores into the air, where they can be inhaled directly into your lungs.
For healthy adults, this might just cause mild irritation, similar to seasonal allergies — a runny nose, sneezing, or slightly itchy eyes. But for children, the elderly, or anyone with asthma or compromised immune systems, prolonged exposure to these bathroom molds can trigger severe asthma attacks and chronic respiratory infections. Regardless of the exact strain, mold simply does not belong in the place where you go to get clean.
Why Bathtub Caulk Gets Mold (And Why It Keeps Coming Back)
Your bathtub caulk line is the perfect mold incubator. It sits at the junction where water pools after every shower. It stays warm. It collects soap scum, skin oils, and shampoo residue — all of which are food for mold. And silicone caulk is porous enough for mold to root into.
Every time you take a hot shower, you are creating a 90°F, 100% humidity microclimate directly on the caulk line. Mold spores — which are always present in indoor air — land on the warm, wet, nutrient-rich surface and germinate within 24 to 48 hours. Within a week, you have visible colonies. Within a month, the hyphae are deep enough that surface cleaning cannot reach them.
This is the cycle millions of homeowners are stuck in. Spray, scrub, watch it return. The reason it fails is contact time — the single most important factor in mold removal that most people completely ignore.
Hydrogen Peroxide vs Bleach: Which Is Better for Mold?
For generations, bleach has been the go-to solution for any mold problem. But modern cleaning science has proven that bleach is actually counterproductive when dealing with porous surfaces like silicone caulk. Bleach is primarily water with a small percentage of sodium hypochlorite. The chemical structure of sodium hypochlorite prevents it from soaking into the silicone. Instead, it stays on the surface, bleaching the color out of the mold so it turns white and invisible, while the water component soaks into the caulk and actually feeds the roots.
Hydrogen peroxide, on the other hand, is vastly superior for mold elimination. It acts as an oxidizing agent. When hydrogen peroxide makes contact with mold, it causes a fizzy, bubbling reaction. This reaction physically breaks down the mold’s cellular structure, destroying the proteins and DNA within the spores and roots. Because it has a different molecular structure, peroxide can penetrate deeper into the microscopic pores of the caulk.
Furthermore, hydrogen peroxide leaves no toxic residue. As it breaks down, it decomposes into simple water and oxygen. Bleach leaves behind toxic chloramines and off-gases VOCs that degrade indoor air quality. If you want to actually kill the mold rather than just bleach it blonde, peroxide is the undisputed winner for DIY solutions.
When to Remove and Replace Caulk vs Clean It
One of the most common questions homeowners ask is whether they should bother cleaning the mold or just rip out the caulk and start fresh. Replacing caulk is a messy, time-consuming job that requires chemical softeners, razor blades, and precise application skills. You only want to go this route if it is absolutely necessary.
You should attempt cleaning if the caulk line is still structurally sound. This means it is firmly adhered to both the tub and the wall, with no peeling edges, cracks, or gaps. If the mold looks like dark spots or a continuous black line but the silicone itself is intact, a deep gel or paste treatment can salvage it, saving you hours of labor and the cost of new materials.
However, you must replace the caulk if you notice water getting behind it, if the edges are lifting, or if the silicone has become brittle and cracked. In these scenarios, the mold isn’t just on or in the caulk—it has bypassed the seal entirely and is likely growing inside your wall cavity. No surface cleaner can fix a compromised waterproof seal, and ignoring it will lead to severe rot and structural damage behind your tub.
🧹 What You Need
- 🔹 Baking soda — alkaline abrasive (pH 8.3) that disrupts mold’s acidic environment
- 🔹 3% hydrogen peroxide — oxidizing agent that destroys mold cell walls
- 🔹 Plastic wrap — to hold paste against the caulk line and prevent drying
- 🔹 Old toothbrush — for applying and scrubbing the paste into caulk
- 🔹 Microfiber cloth — for final wipe-down
⚡ Skip the DIY? The Faster Solution
If you have been fighting caulk mold for months and want it gone overnight without any scrubbing, a professional mold removal gel is the single best investment you can make. Unlike sprays, the thick gel formula clings directly to the caulk line for 6+ hours, penetrating deep into the silicone to kill mold at the root. You apply it before bed, wake up, rinse — and the mold is gone. Thousands of homeowners have switched from the spray-scrub-repeat cycle to this gel and never looked back.
Step 1: Make a Thick Peroxide-Baking Soda Paste
Mix 4 tablespoons of baking soda with 2 tablespoons of hydrogen peroxide (3%) until you get a thick paste — the consistency of peanut butter. Too runny and it slides off the caulk. Too thick and it dries before penetrating.
When you mix these two ingredients, you will notice a slight fizzing reaction. This is the peroxide releasing oxygen, which is exactly what makes it so effective at destroying the molecular structure of the mold spores. It is crucial to mix this paste right before you plan to use it; if you mix it hours in advance, the oxidative power will diminish, leaving you with a less potent cleaner.
If your caulk lines cover a massive area, simply double or triple the recipe using the 2:1 ratio of baking soda to hydrogen peroxide. Some people like to add a drop or two of dish soap to the mix to help cut through the layer of body oils and soap scum that often covers the mold, ensuring the paste can make direct contact with the spores.
💡 The Science: Baking soda creates an alkaline environment (pH 8+) that is hostile to mold, which thrives at pH 3-7. Hydrogen peroxide releases hydroxyl free radicals (OH⁻) that oxidize ergosterol — a lipid essential to mold cell membranes. Without intact ergosterol, the cell membrane ruptures and the mold dies. This is the same mechanism used in prescription antifungal drugs, just in a milder form.
Step 2: Apply to the Caulk Line and Seal with Plastic Wrap
Using an old toothbrush, press the paste directly into the caulk line along the entire length of the tub. Make sure it is packed into the seam, not just sitting on top. Then cover the paste with strips of plastic wrap pressed firmly against the caulk.
The plastic wrap serves two critical functions: it prevents the paste from drying out (dried paste stops working because the peroxide needs moisture to generate free radicals) and it holds the paste against the vertical surface by gravity alone. You want to make sure the wrap is pressed tight, creating an airtight seal over the paste.
Applying the paste takes patience. Do not just smear it haphazardly. Use the bristles of your toothbrush to actively work the paste into the microscopic crevices of the silicone. The physical agitation helps break the surface tension, allowing the hydrogen peroxide to seep deeper into the caulk where the root systems are hiding. Pay special attention to the corners of the bathtub, where water tends to pool and mold growth is typically the densest.
💡 Pro Tip: This is exactly why mold removal gels outperform DIY pastes — a purpose-built gel has the perfect viscosity to cling to caulk lines without plastic wrap, and its slow-release formula stays active for 6 to 8 hours without drying. No mixing, no mess, no babysitting.
Step 3: Wait 2 to 4 Hours (Or Overnight)
Leave the paste on for a minimum of 2 hours. For deep-set mold that has been building for months, leave it overnight — the longer the contact time, the deeper the peroxide penetrates into the silicone pores.
During this waiting period, the chemistry is doing the heavy lifting. The alkaline nature of the baking soda is slowly breaking down the protective acidic barrier of the mold, while the peroxide is tunneling into the silicone matrix, executing a search-and-destroy mission against the embedded hyphae. Rushing this step is the number one reason DIY mold removal fails.
Do not use the bathtub during this time. Any water contact will wash the paste away and reset the clock. Make sure other household members know the shower is off-limits. If the bathroom has a window, keep it open to ensure adequate ventilation, as the mild off-gassing from the oxidation process can sometimes smell slightly stale or earthy as the mold dies.
Step 4: Remove, Scrub, and Rinse
Peel off the plastic wrap, then scrub the caulk line with the toothbrush under warm running water. Most of the mold should lift away easily. The baking soda acts as a gentle abrasive during this phase, helping to physically dislodge the dead mold spores from the surface of the silicone without scratching it.
Wipe the entire area dry with a clean microfiber cloth. Drying is critical because it removes the last traces of the paste and gives you a clear look at the actual condition of the caulk. Any leftover moisture would also just invite new mold to settle immediately.
Inspect the result carefully. If black staining remains, the mold has penetrated deeper than 2-3mm into the silicone. Do not panic—this is common for severe infestations. At this point, you have a few options to proceed:
- Option A: Repeat the paste treatment 2 to 3 more times over the next week to inch deeper into the roots.
- Option B: Use a concentrated mold removal gel for a one-application solution — the professional-grade formula penetrates deeper and works faster than any homemade paste.
- Option C: Remove and replace the caulk entirely (last resort).
Preventing Mold from Coming Back: Ventilation & Humidity Control
Killing the mold is only half the battle. If you do not address the moisture problem, it will return within 2 to 4 weeks. Mold spores are microscopic and omnipresent in our indoor air. They are just waiting for the right conditions—moisture, warmth, and a food source—to set up camp again. By altering the microclimate in your bathroom, you can make it impossible for mold to survive.
The absolute best defense is aggressive ventilation. Your bathroom exhaust fan should be rated for the square footage of your room (measured in CFMs). It needs to pull the humid air out of the room quickly and vent it outside the house, not just into the attic. Running the fan for a few minutes while you shower is not enough; the humidity lingers long after the water is turned off.
Additionally, the physical removal of standing water on the caulk line is vital. Silicone caulk is often applied with a slight concave curve, which inadvertently creates a tiny gutter that traps water. By taking 10 seconds to swipe away this moisture, you deprive the spores of the hydration they desperately need to germinate.
- Run the exhaust fan for 30 minutes after every shower — this is non-negotiable. It is the single most effective mold prevention step.
- Squeegee the tub walls and caulk line after each shower to remove standing water.
- Spray the caulk line with hydrogen peroxide once a week as a preventative — takes 10 seconds.
- Keep bathroom humidity below 60% — a $15 hygrometer will tell you instantly.
- Leave the bathroom door open after showering to promote air circulation.
- Replace old caulk with mold-resistant silicone caulk every 3 to 5 years.
⚠️ What Not to Do
- ❌ Never mix bleach with vinegar or peroxide — produces toxic chlorine gas or peracetic acid vapors
- Do not scrub dry mold — always wet it first or you will launch thousands of microscopic spores into the air
- Do not use abrasive scrub pads on silicone caulk — they shred the surface, creating more pores for mold to colonize
- Do not apply new caulk over moldy caulk — the mold grows underneath and returns within weeks
- Do not rely on spray cleaners for caulk line mold — the contact time is too short to kill embedded hyphae
❓ FAQ
Why does mold keep coming back on my bathtub caulk?
Because spray cleaners only kill surface mold. The root system (hyphae) lives 2 to 3mm inside the porous silicone. Unless you use a treatment with extended contact time — like an overnight paste or a purpose-built caulk gel — the roots survive and regrow within days.
Is black caulk mold dangerous?
Most bathroom caulk mold is Cladosporium or Aspergillus — both are allergenic and can trigger respiratory symptoms, especially in people with asthma. True Stachybotrys (toxic black mold) is less common in showers but possible in chronically wet bathrooms. Either way, visible mold should always be treated promptly.
Should I just replace the caulk instead?
If the caulk is cracking, peeling, or deeply stained after multiple treatments, yes — replacement is the right call. But if the caulk is still structurally sound and the mold is surface-to-moderate depth, a mold removal gel can save the caulk and save you the hassle of re-caulking. It is significantly easier than removing and reapplying silicone.
How is a mold removal gel different from bleach spray?
Three critical differences: (1) Viscosity — gel clings to vertical caulk lines for hours; spray drips off in seconds. (2) Contact time — gel stays active for 6+ hours vs. seconds for spray. (3) Penetration — the gel formula is designed to seep into silicone pores and reach embedded hyphae that sprays cannot touch. It is the difference between rinsing a stain and soaking it.
How long does it take for black mold to grow back?
If the roots were not fully killed, mold can resurface within 7 to 14 days under humid conditions. If you successfully kill the roots but fail to control bathroom humidity, new mold spores from the air can settle and grow into visible colonies within 3 to 4 weeks. Moisture control is the only way to stop it permanently.
Can I use vinegar to remove mold from caulk?
Vinegar is effective against some types of mold, but its low viscosity means it runs off caulk lines too quickly to kill embedded roots. While you can soak a paper towel in vinegar and press it against the caulk to increase contact time, the mild acetic acid in vinegar often struggles to penetrate silicone as effectively as hydrogen peroxide or specialized gels.
Does baking soda kill mold or just remove the stain?
Baking soda does both. As a mild alkaline abrasive, it physically scrubs away the black surface staining without scratching the tub. Chemically, its high pH (around 8.3) creates a hostile environment that disrupts the acidic conditions most mold species need to survive, effectively killing the organism when given enough contact time.
Can I mix baking soda with bleach for extra power?
While technically safe (unlike mixing bleach with vinegar or ammonia), mixing baking soda and bleach is unnecessary and less effective than a peroxide paste. Bleach struggles to penetrate porous silicone regardless of whether it is mixed with a powder, meaning it still won’t reach the deepest roots of the mold infestation.
🏆 Our Top Recommendation
If you are tired of the spray-scrub-repeat cycle, do yourself a favor and try a professional mold removal gel. Apply it to the caulk line before bed, go to sleep, and rinse it off in the morning. No scrubbing. No mixing. No plastic wrap. Thousands of reviews confirm what the science predicts — extended contact time with a gel formula is the most effective way to kill caulk mold at the root.
✅ Bottom Line
Bathtub caulk mold is persistent because the roots grow inside the porous silicone, and spray cleaners do not have enough contact time to reach them. A baking soda and peroxide paste sealed with plastic wrap is an effective DIY approach if you have 2 to 4 hours to spare. For a faster, no-scrub solution, a mold removal gel delivers professional-grade results overnight. Either way, the key insight is the same: contact time kills mold, not scrubbing force. Fix the moisture problem afterward and the mold stays gone.
📖 Related Cleaning Guides
- How to Clean a Stained & Rusty Toilet Bowl with Baking Soda, Dawn & Vinegar
- How to Deodorize a Smelly Washing Machine Naturally
- How to Clean Black Mold from Shower Caulk Lines for Good
- How to Clean a Stained Toilet Bowl with Cola and Baking Soda
- How to Remove Black Mold from Shower Caulk with Beer and Baking Soda
- How to Clean Soap Scum Off Glass Shower Doors